- Mar 15, 2022
- --
How Headless Magnolia Fits Together With Your Front-End Framework
-
 Martina MichlovaSenior Front-End Solution Architect, Magnolia


Experience Magnolia in action
Experience Magnolia's key features firsthand in an interactive product tour.
Take a tour nowMagnolia is becoming the headless CMS of choice for front-end developers looking to build rich experiences using Single Page Applications (SPAs). But with the proliferation of SPA frameworks such as React, Vue, Angular, Ember, and many, many more, it is often hard to conceptualize how your JavaScript (JS) framework of choice will integrate with Magnolia.
This blog is intended to help front-end developers to gain a clearer understanding of how Magnolia integrates seamlessly with any JS framework. The examples used throughout this article will be based on React, but the principles covered are directly transferable to other frameworks.
Key Components
Magnolia provides the following key components for use with SPAs. We will explain each of these in detail:
/pages endpoint - Part of Magnolia’s Delivery API, which returns page content.
/template-annotations endpoint - Part of the SPA templating API, which allows content in an SPA to be editable in Magnolia by injecting the green bars.
EditablePage component - Provided as an npm package, this is responsible for determining which React component to render for a given template.
These components allow content authors to use Magnolia’s Visual SPA Editor to edit front-end components, add new content, and instantly preview their changes.
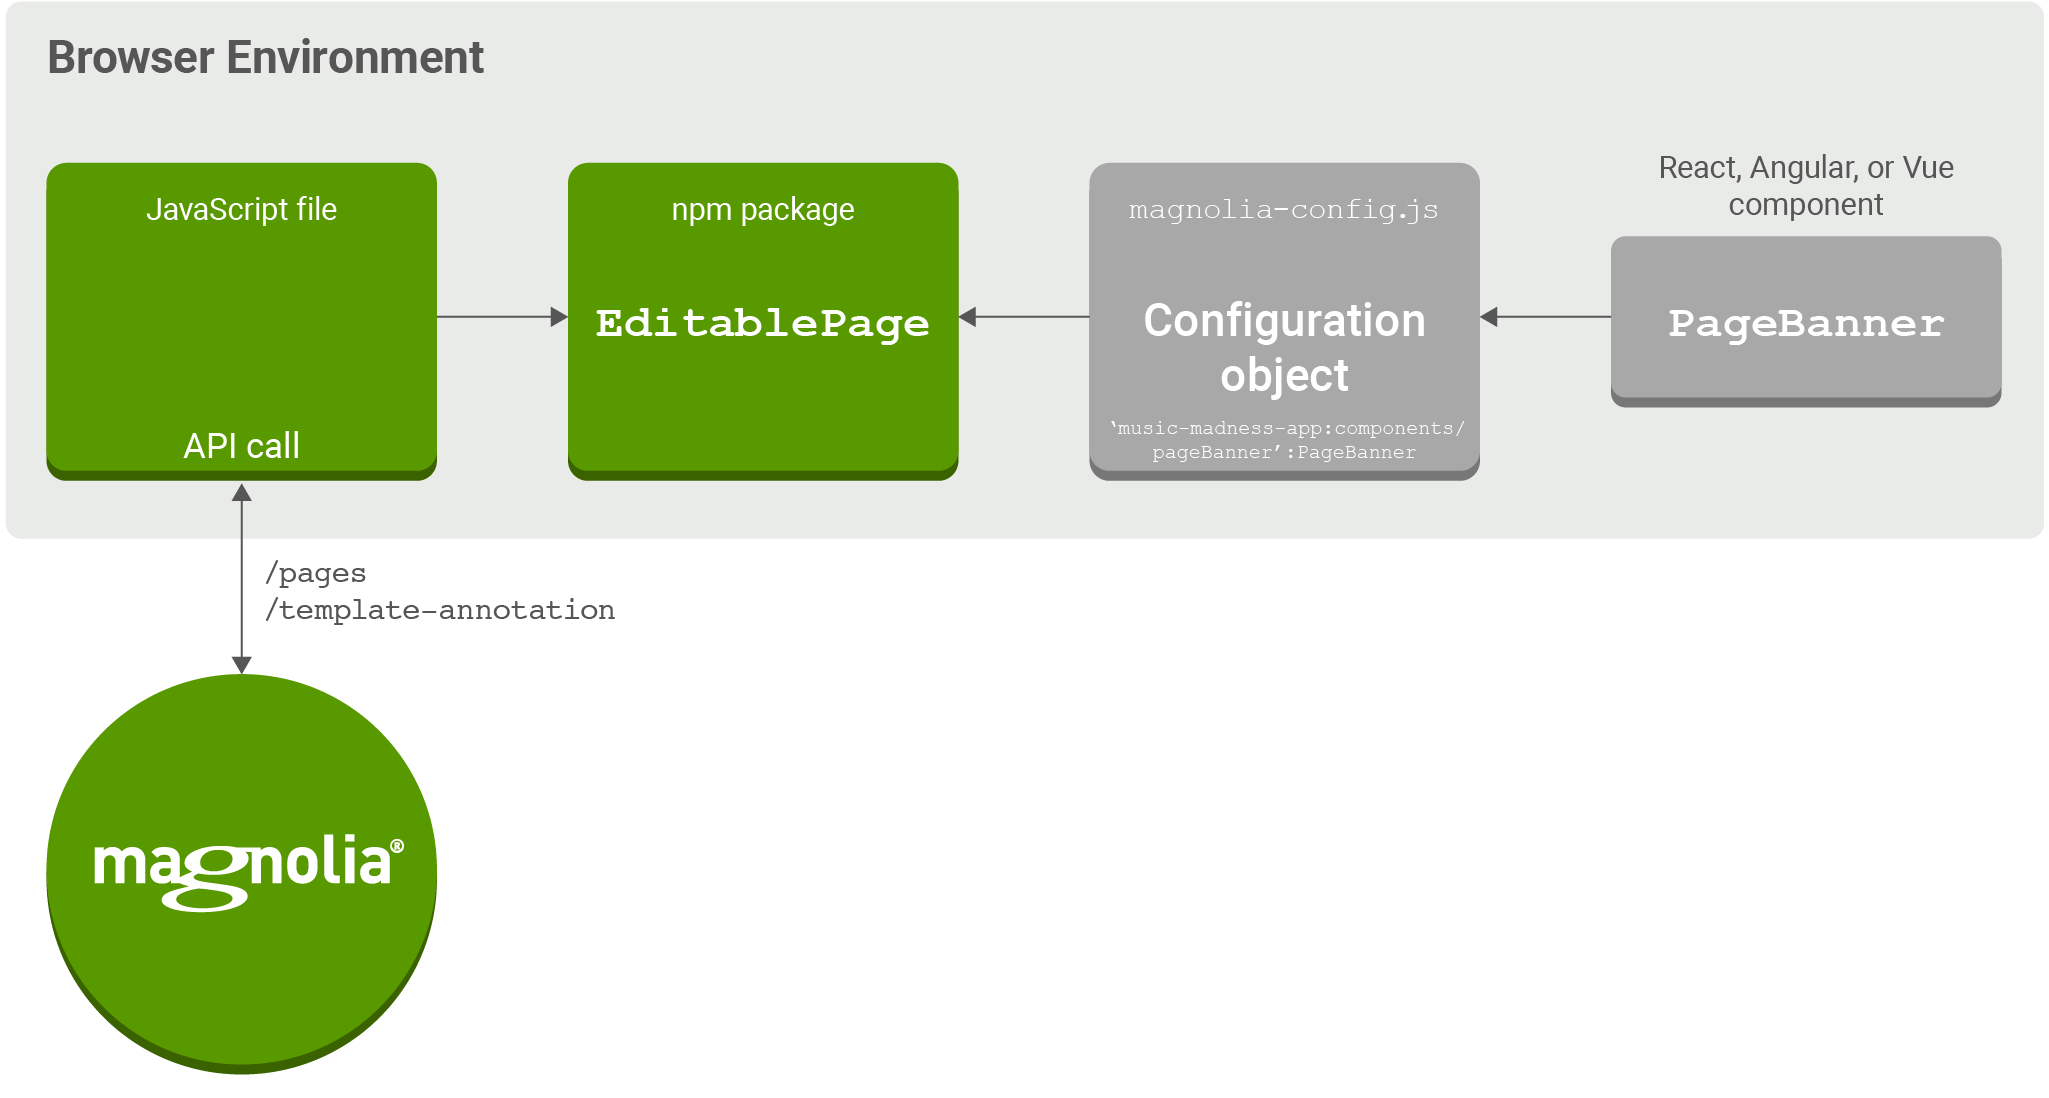
Let’s take a look at the following diagram, which succinctly encapsulates the front-end behavior when an SPA page is loaded:
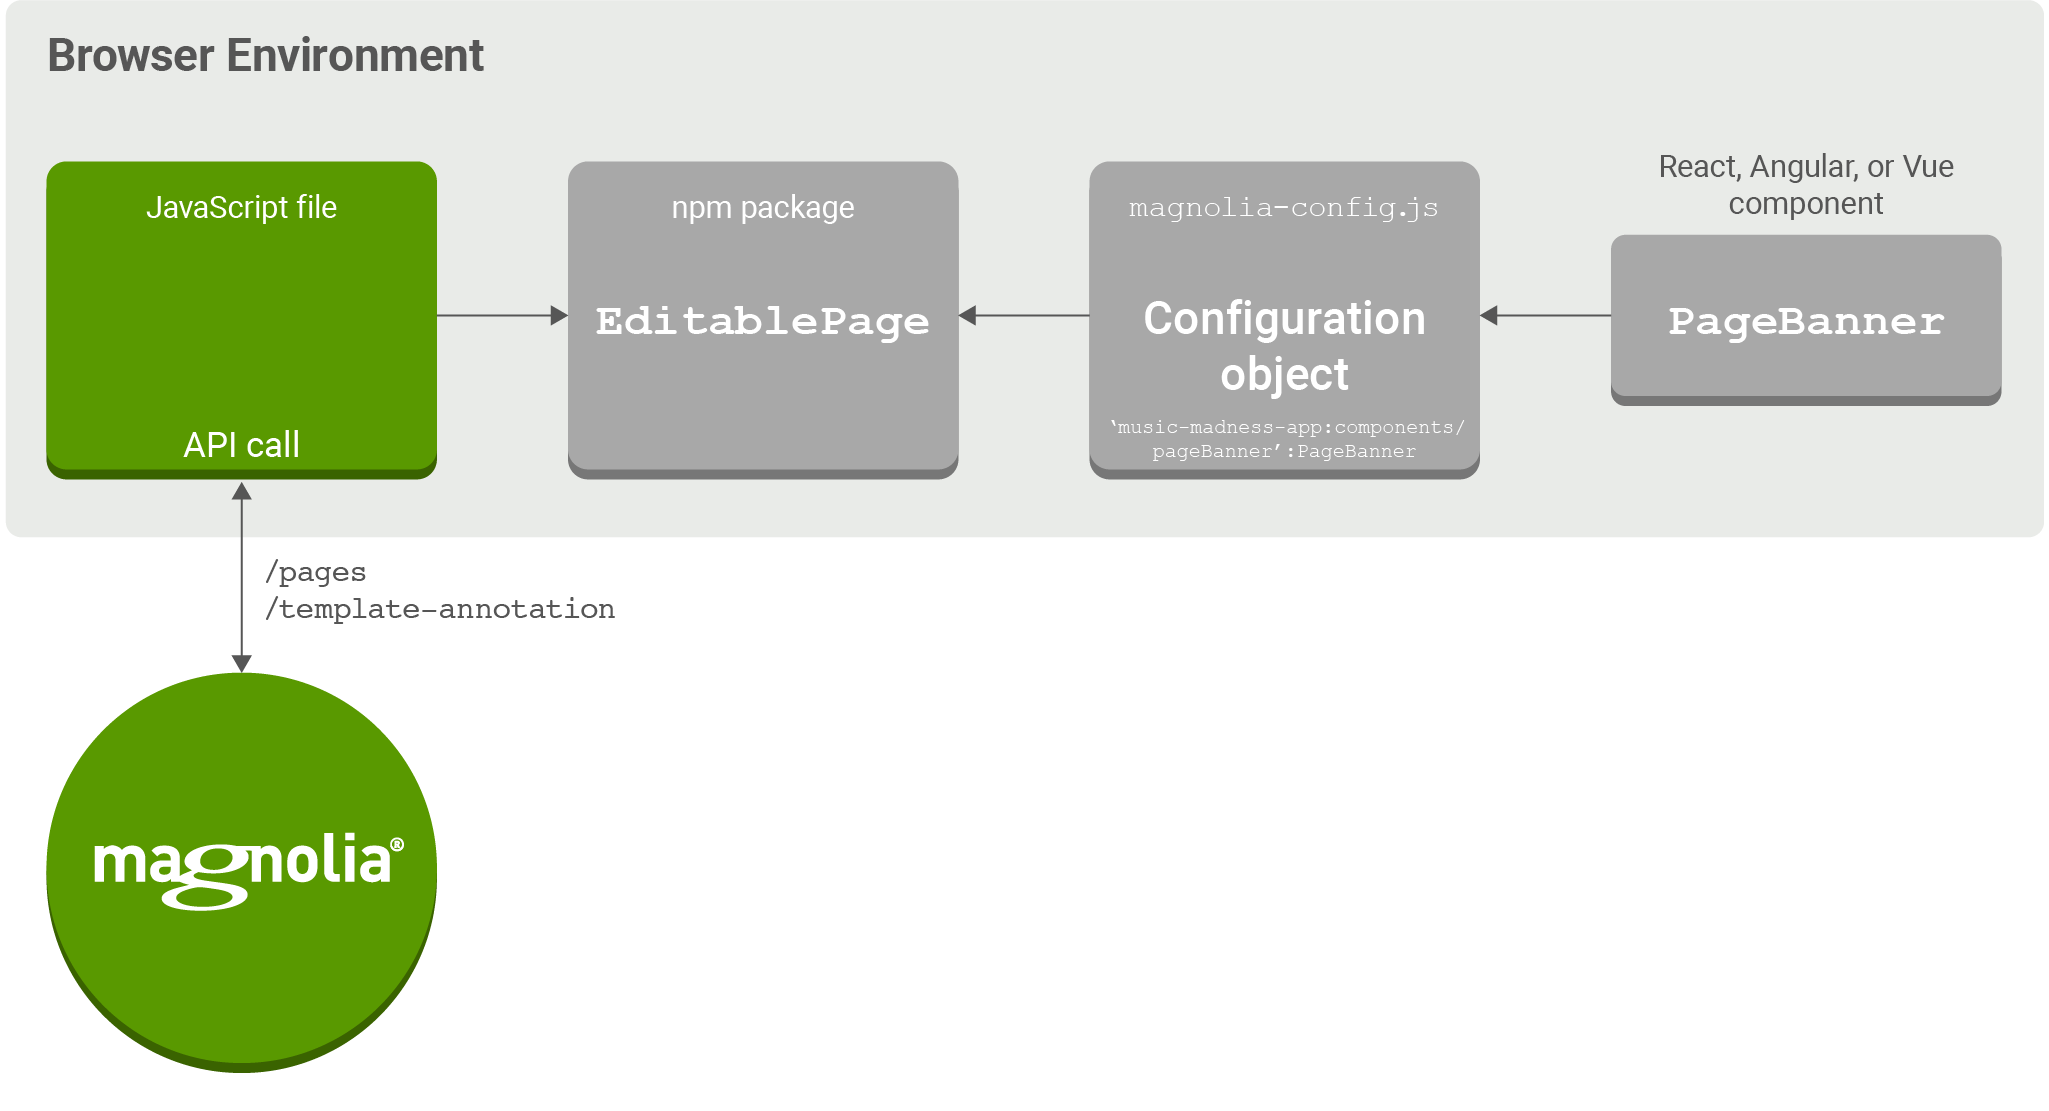
The diagram shows that, once the page loads, an API request is made to fetch data (in JSON format) from the /pages and /template-annotations REST endpoints.
So, let’s dive into the /pages and /template-annotations endpoints to see in more detail what they are used for. We will then describe how the EditablePage component stitches everything together nicely.
The /template-annotations endpoint
This endpoint allows content editors to view and edit front-end components in Magnolia. It is called when a content author is editing a page.
Below is an example that shows a basic carousel component containing a title, “Page Banner”, and a set of images.
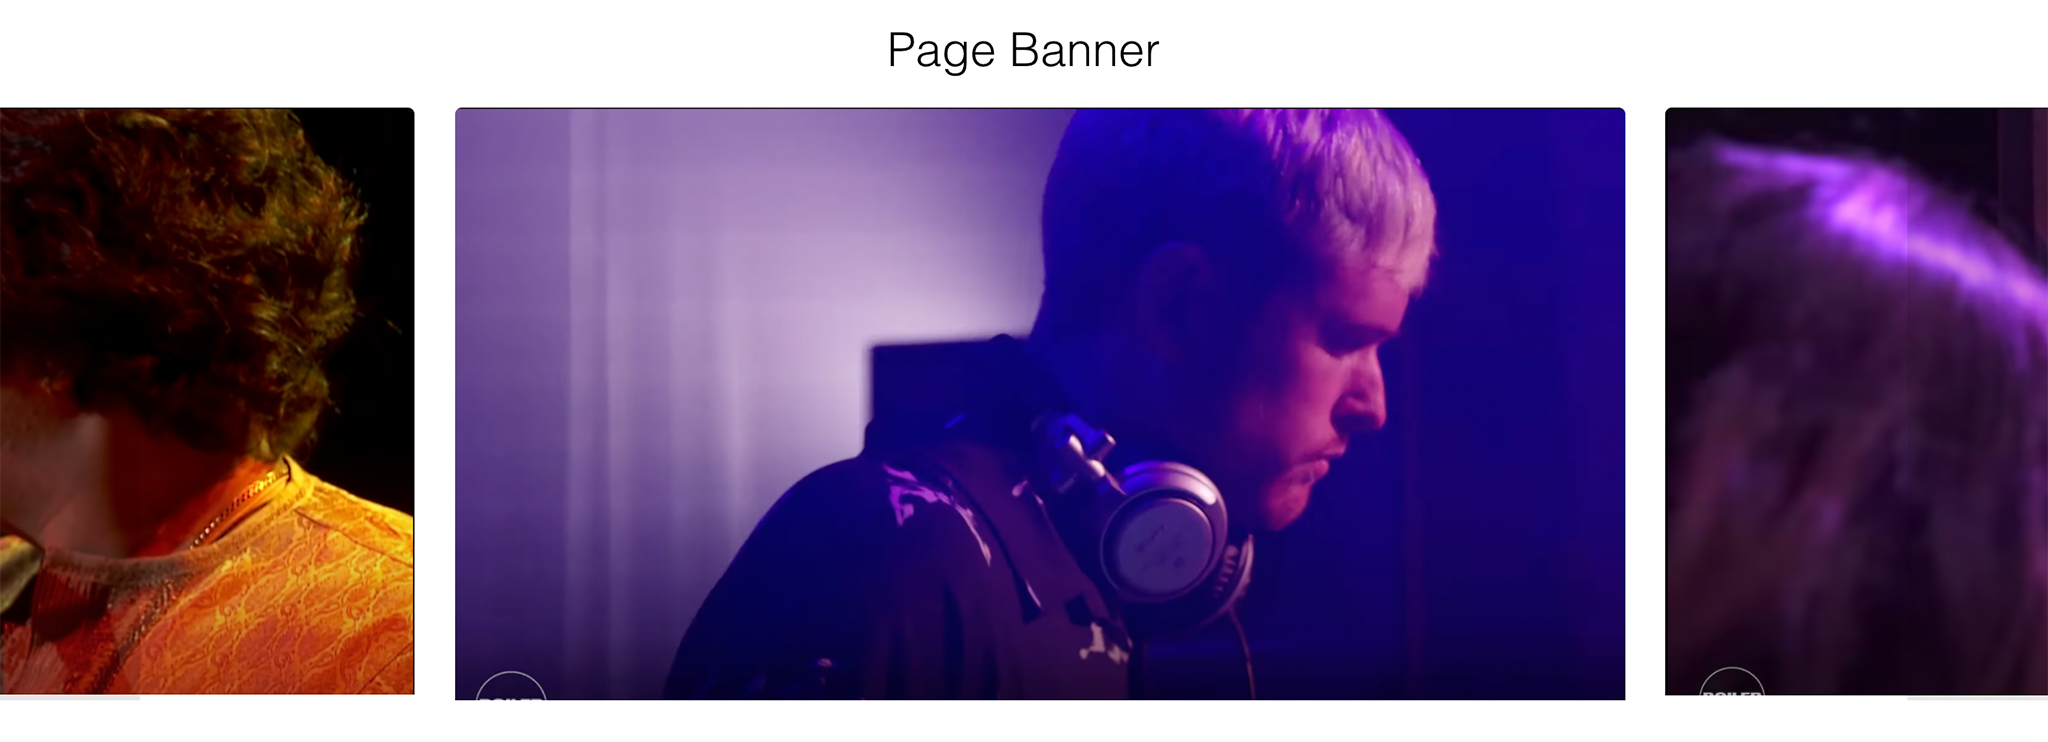
Content editors can edit this component by clicking the pencil icon in the green bar.
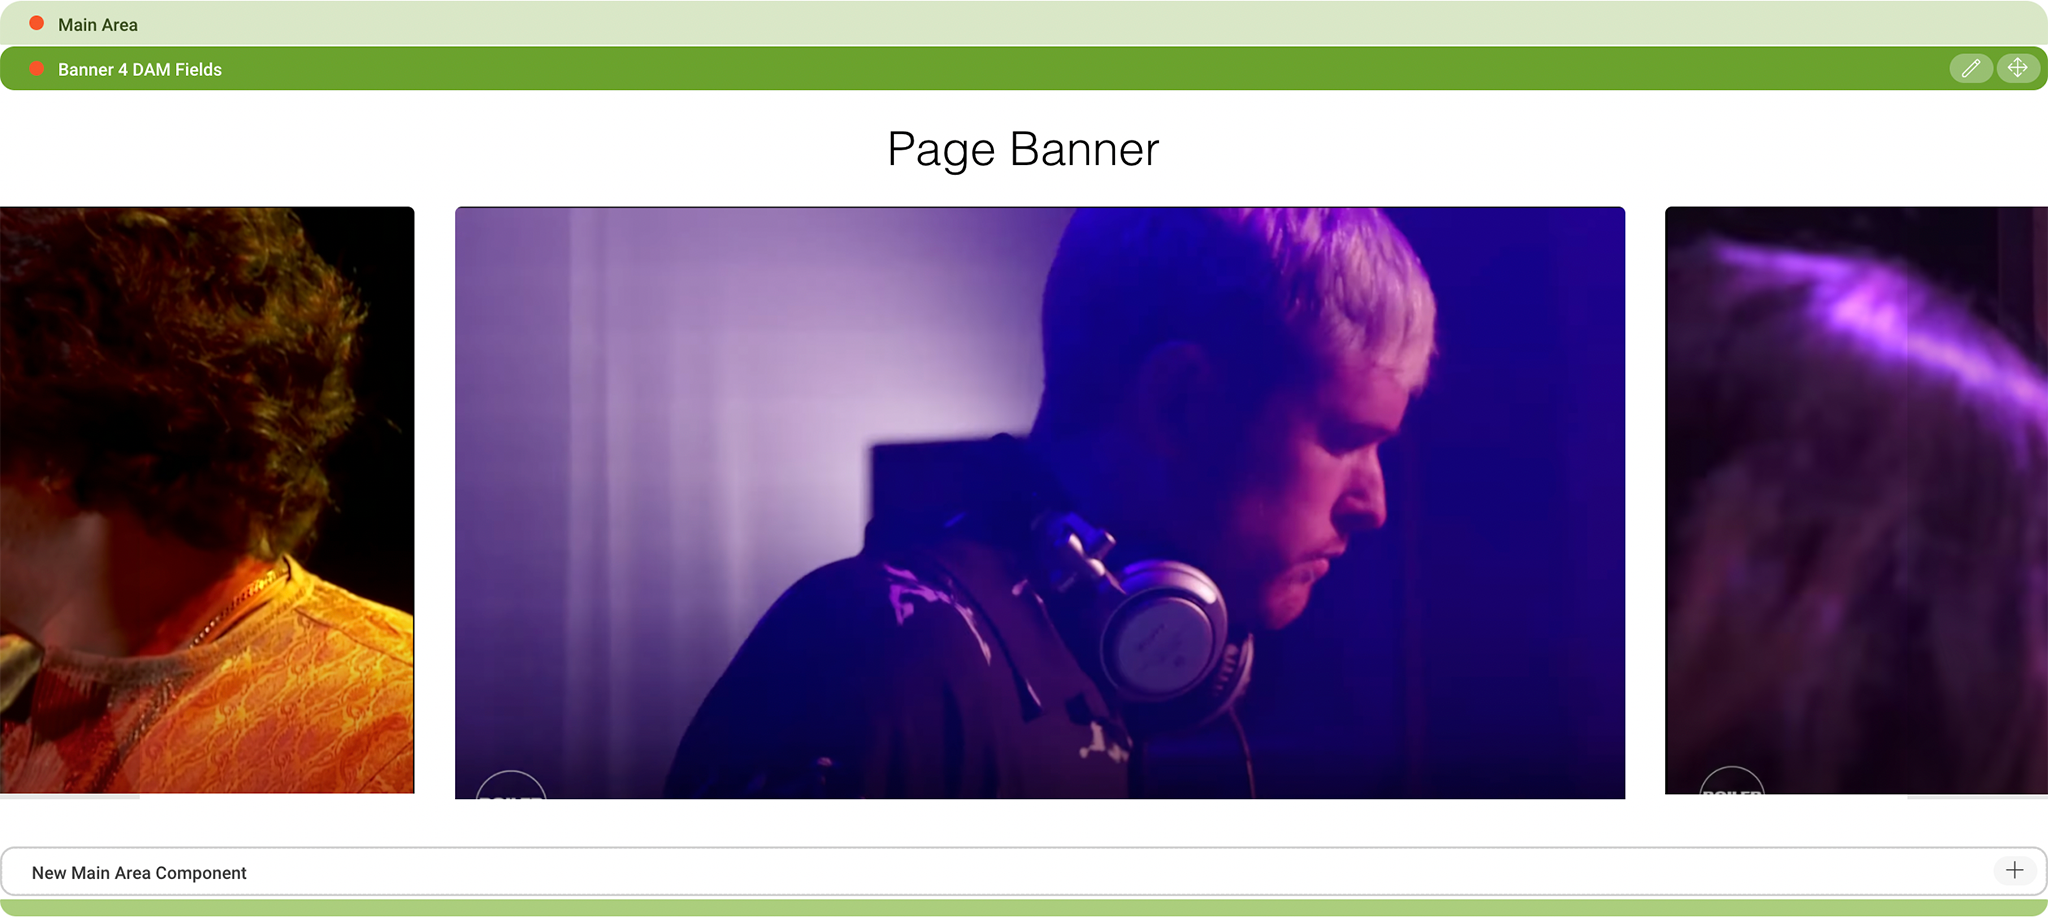
Toggling between edit and view modes is achieved by adding and removing comments, e.g. <!-- comment -->, above the HTML elements for that component, as you can see in the snippet below.

Magnolia does this by getting the /template-annotations response and passing it to the EditablePage component. EditablePage provides the HTML markup for the green top and bottom bars, which is shown when the page is in CMS edit mode. We describe this process in more detail later in this article when we introduce magnolia.config.js as well as diving deeper into the EditablePage component.
The /template-annotations endpoint is the enabler for editable SPAs within Magnolia. It streamlines the editing process by allowing editors to instantly preview content and to get live feedback for their changes. This means that the editing process when using SPAs is indistinguishable from using a non-SPA, standard template approach rendered on the server. By using Magnolia, content editors can gain all the benefits of using SPAs, without any compromise to the editing experience.
Magnolia Headless CMS
Manage content in one hub and reuse it across the web and all your channels. See why Magnolia is great for headless—no need to sacrifice authoring experience and enterprise features.
Learn moreThe /pages endpoint
The /pages endpoint is responsible for returning page content. It returns information such as:
Which components should be rendered on the page.
The layout of the components within the page.
The data/content to display in the components.
In the example below we can see a JSON response returned from the /pages endpoint via /magnoliaAuthor/.rest/delivery/pages/Music-Banners.
 main: {
    0: {}
    @id: f34b748e-a301-4d9a-b6d0-3cf3db9c9b0b
    @name: ‘main’
    @nodeTypes: ‘mgnl:area’
    @nodes: [‘0’]
    @path: ‘/Music-Banner/main’
    mgnl:created: ‘2022-01-26T09:20:30.032Z’
    mgnl:lastModified: ‘2022-01-31T13:29:08.043Z’
}
It contains details on which front-end components are to be included in the page. main refers to the layout of the page, and the index 0 refers to a component within main. If there were additional components here, such as a header and a footer, they would have incremental index values with the same nested sub-fields as shown above (but with different values).
If we drill down further into the response we will be able to see the data entered by the content editors in Magnolia. Depending on the framework, this data is injected into the JS component automatically. For example, in React, data is passed as props. In the below example, we can see the data is image1, image2, image and image4. We could nest this data in an array type property called images, but for simplicity they are shown here as individual values:
 main: {
0: {
@id: ‘0b3baec3-c2e1-4e5e-b454-8a0ab63c76c0’
@name: ‘0’
@nodeType: ‘mgnl:component’
@node: []
@path: ‘mgnl:component’
image1: {@name":"Screenshot 2021-12-13 at 14.42.25...}
image2: {@name: “Screenshot 2021-12-13 at 13.17.18...}
image3: {@name:"Screenshot 2021-12-13 at 13.16.53"...}
image4: {@name":"Yaeji"}
mgnl:created: ‘2022-01-31T13:29:58.887Z’
mgnl:lastModified: ‘2022-01-31T13:29:58.893Z’
mgnl:template: ‘music-maddness-app:components/pageBanner’
}
}
The below snippet shows how the React template reads the image props, as defined above. In the example below the props are passed into a banner component:
 const PageBanner = (props) => {
   return (
       <>
           <h1>Page Banner</h1>
           <Banner
               image1={props.image1}
               image2={props.image2}
               image3={props.image3}
               image4={props.image4}
           />
       </>
   )
}
EditablePage
Here we see how the response of the API call is fed into the EditablePage component.
The mapping of props to the data returned from the /pages endpoint is handled by the EditablePage component. This is shown in the following code snippet which shows how the EditablePage component is rendered in the page:
 <EditablePage
   templateAnnotations={templateAnnotations}
   content={pages}
   config={config}
   >

</EditablePage>
EditablePage contains the following:
templateAnnotations - HTML markup for the green editing bars that are shown when Magnolia is in edit mode
content - The page content that is injected into the React props
config - The template mapping (config) of the components and pages - this comes
Note: The code snippet above is extracted from the PageLoader.js, which is a component that is created when you checkout the Magnolia headless starter project:
magnolia.config.js
The final part of our expanded component architecture diagram introduces magnolia.config.js which is responsible for passing the config element to the EditablePage component.
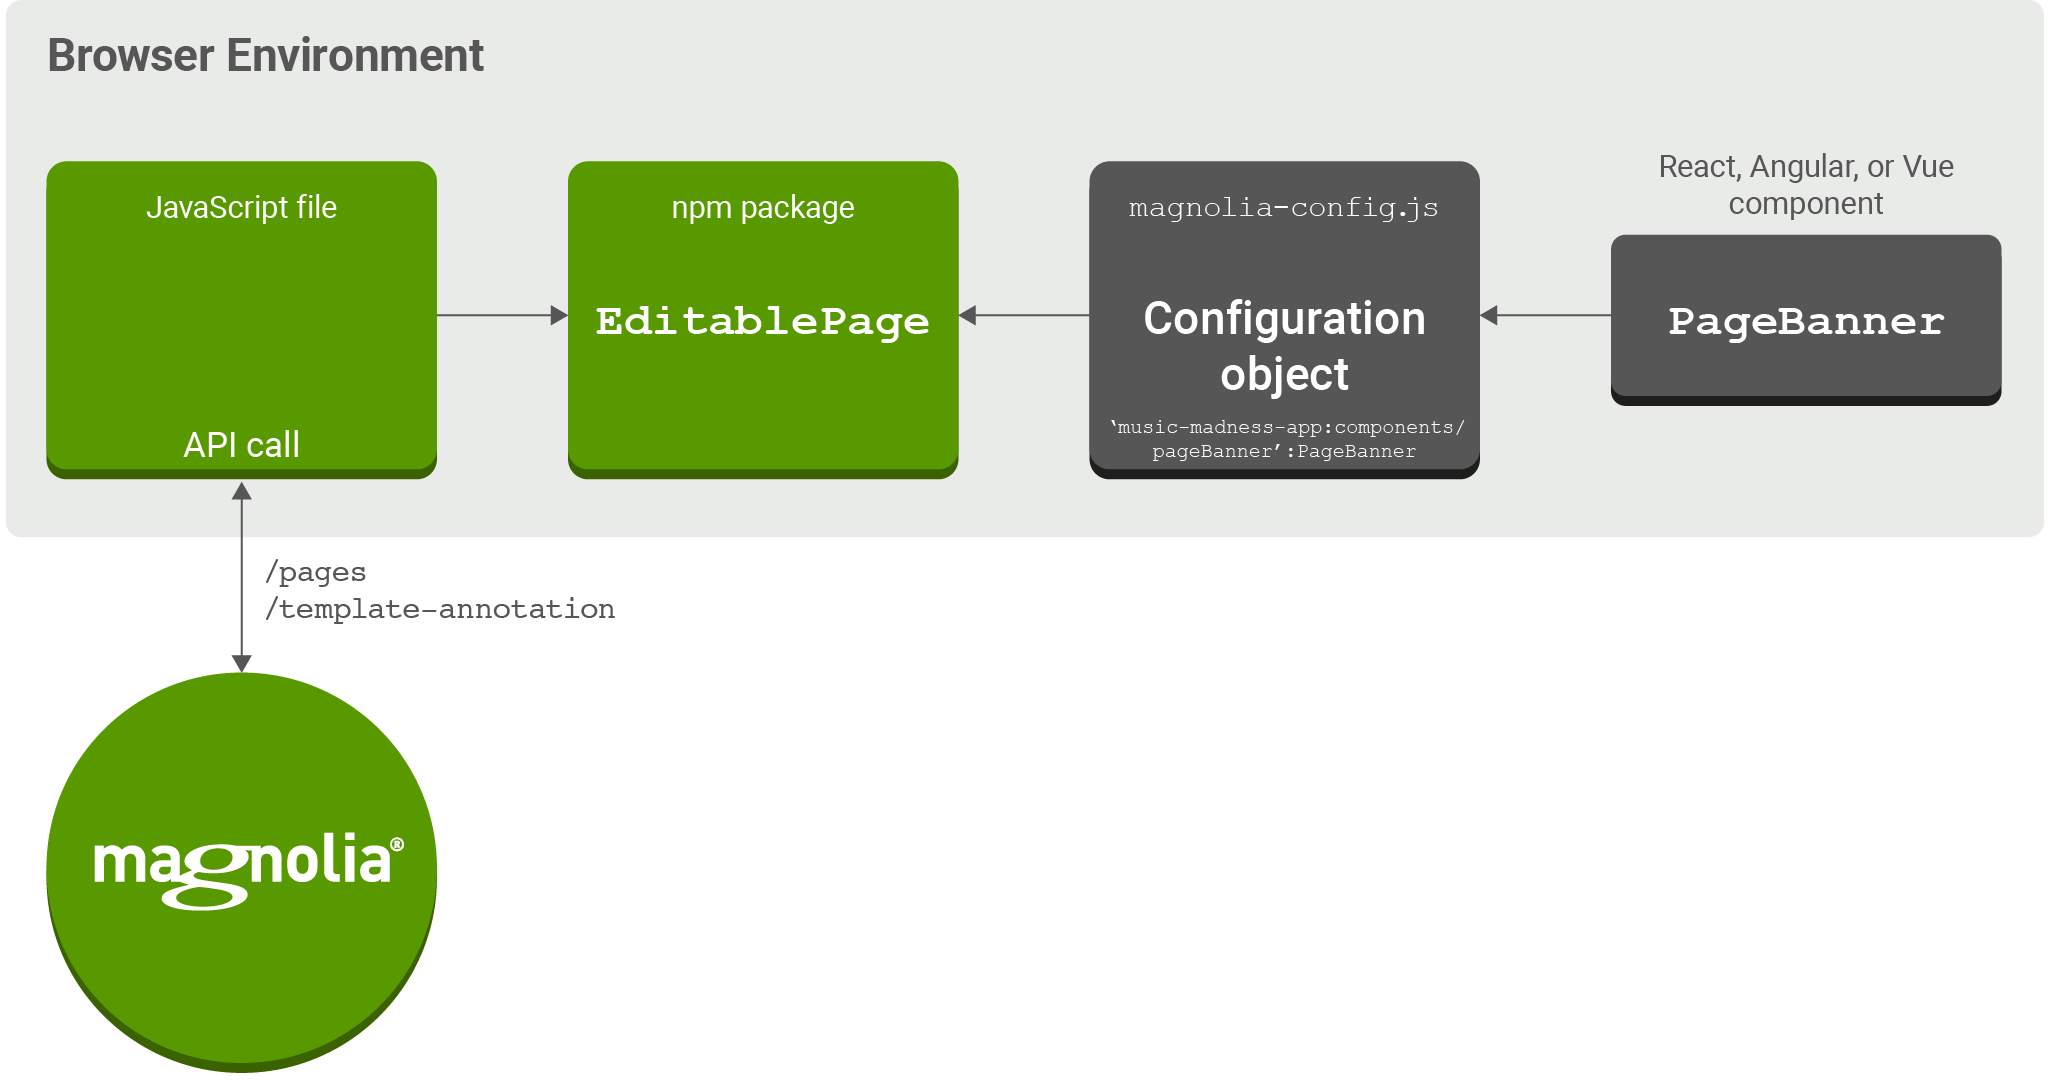
magnolia.config.js is responsible for mapping the template returned from the /pages endpoint to a particular JavaScript component. In our example this is the PageBanner component, built with React. To map React components to Magnolia content components, developers must create the magnolia.config.js file.
Below is an example magnolia.config.js. It shows the PageBanner React component being assigned to the Magnolia template component with the identifier:
music-maddness-app:components/pageBanner
This identifier is returned in the response from the /pages endpoint and is also present in the config object, as shown below.
 const config = {
 componentMappings: {
   'music-maddness-app:components/headline': Headline,
   'music-maddness-app:components/banner': BannerHome,
   'music-maddness-app:components/recommendationHome': RecommendationsHome,
   'music-maddness-app:components/pageBanner': PageBanner,
 },
};

export default config;
If we return to the response from the /pages endpoint, we can see where the template identifier (mgnl:template value) is passed, in the last line below:
 main: {
0: {
@id: ‘0b3baec3-c2e1-4e5e-b454-8a0ab63c76c0’
@name: ‘0’
@nodeType: ‘mgnl:component’
@node: []
@path: ‘mgnl:component’
image1: {@name":"Screenshot 2021-12-13 at 14.42.25...}
image2: {@name: “Screenshot 2021-12-13 at 13.17.18...}
image3: {@name:"Screenshot 2021-12-13 at 13.16.53"...}
image4: {@name":"Yaeji"}
mgnl:created: ‘2022-01-31T13:29:58.887Z’
mgnl:lastModified: ‘2022-01-31T13:29:58.893Z’
mgnl:template: ‘music-maddness-app:components/pageBanner’
}
}
Summary
In this article we have explained how Magnolia exposes the /pages and /template-annotations endpoints which, along with the EditablePage component and magnolia.config.js, combine to provide a system for rapidly building content-connected SPAs. This approach allows front-end developers to build rich SPAs without requiring any specialized CMS skills, with minimal setup, and with only a rudimentary understanding of Magnolia.
Links
React EditablePage component:
Angular EditablePage component:
Vue EditablePage component: