- Nov 16, 2021
- --
Web Components Part 2: Creating a Magnolia Web Component
-
 Jorge FrancoSenior Software Engineer, Magnolia


Experience Magnolia in action
Experience Magnolia's key features firsthand in an interactive product tour.
Take a tour nowIn my previous blog post, “Web Components Part 1: Exploring Reusable Web Components” I explored Web Components as a way of overcoming the challenges of new front-end frameworks and technologies emerging constantly. By allowing developers to create reusable elements, Web Components is making life much easier for us.
In this post, I will show you how to build a web component called “hierarchical-browser” to navigate a hierarchical data structure using JavaScript and several Magnolia features, including our low-code development approach, content types, and our Delivery API. The source code is available on GitHub.
Magnolia Setup
Using YAML, I created a Magnolia Content app with Magnolia Light Development, our low-code development approach. If you are not familiar with Light Development yet, you can check out our Hello Magnolia tutorial.
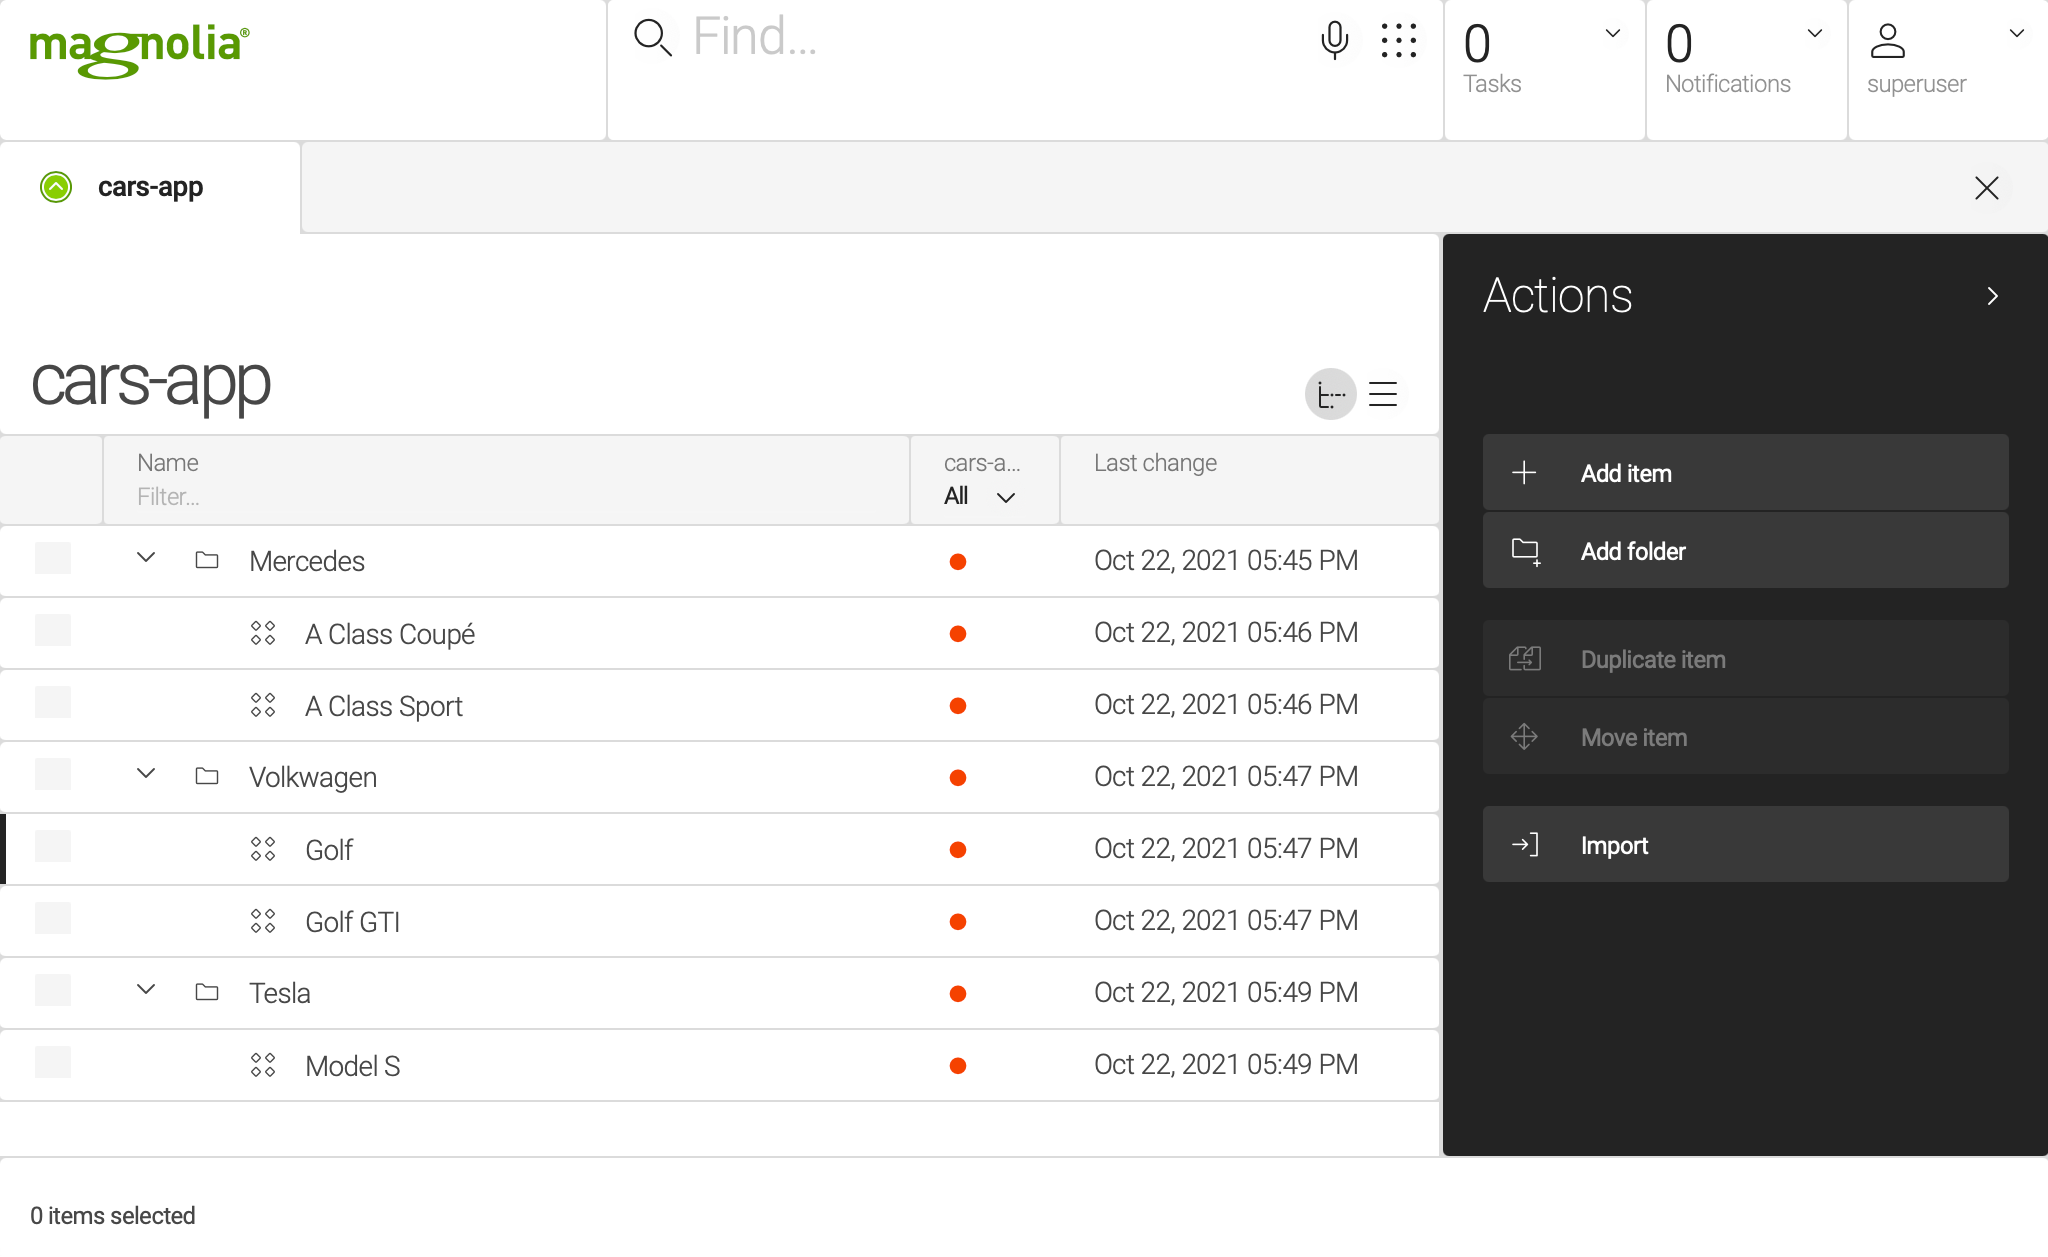
The source code on GitHub already contains an entire Magnolia light module called “cars,” including the Content app “cars-app,” the content type “cars,” the page template, and the web component.
  cars
  ├── apps
  │   └── cars-app.yaml <-- Content app
  ├── contentTypes
  │   └── cars.yaml <-- Content type
  ├── restEndpoints
  │   └── delivery
  │       └── cars.yaml <-- Delivery endpoint
  ├── templates
  │   └── pages
  │       ├── main.ftl <-- Page using web component
  │       └── main.yaml <-- Page definition
  └── webresources
      └── hierarchical-browser.js <-- Web component
Once you’ve cloned the code into your Magnolia instance, open the app and enter some initial data:
To allow front ends to query this data via API, I added an endpoint definition in cars/restEndpoints/delivery/cars.yaml. The cars endpoint makes content available from the cars workspace, where Magnolia stores all cars content hierarchically.
To allow users to see this content, we have to allow anonymous access to the cars workspace, as we are not using any authentication mechanism for this REST Client.
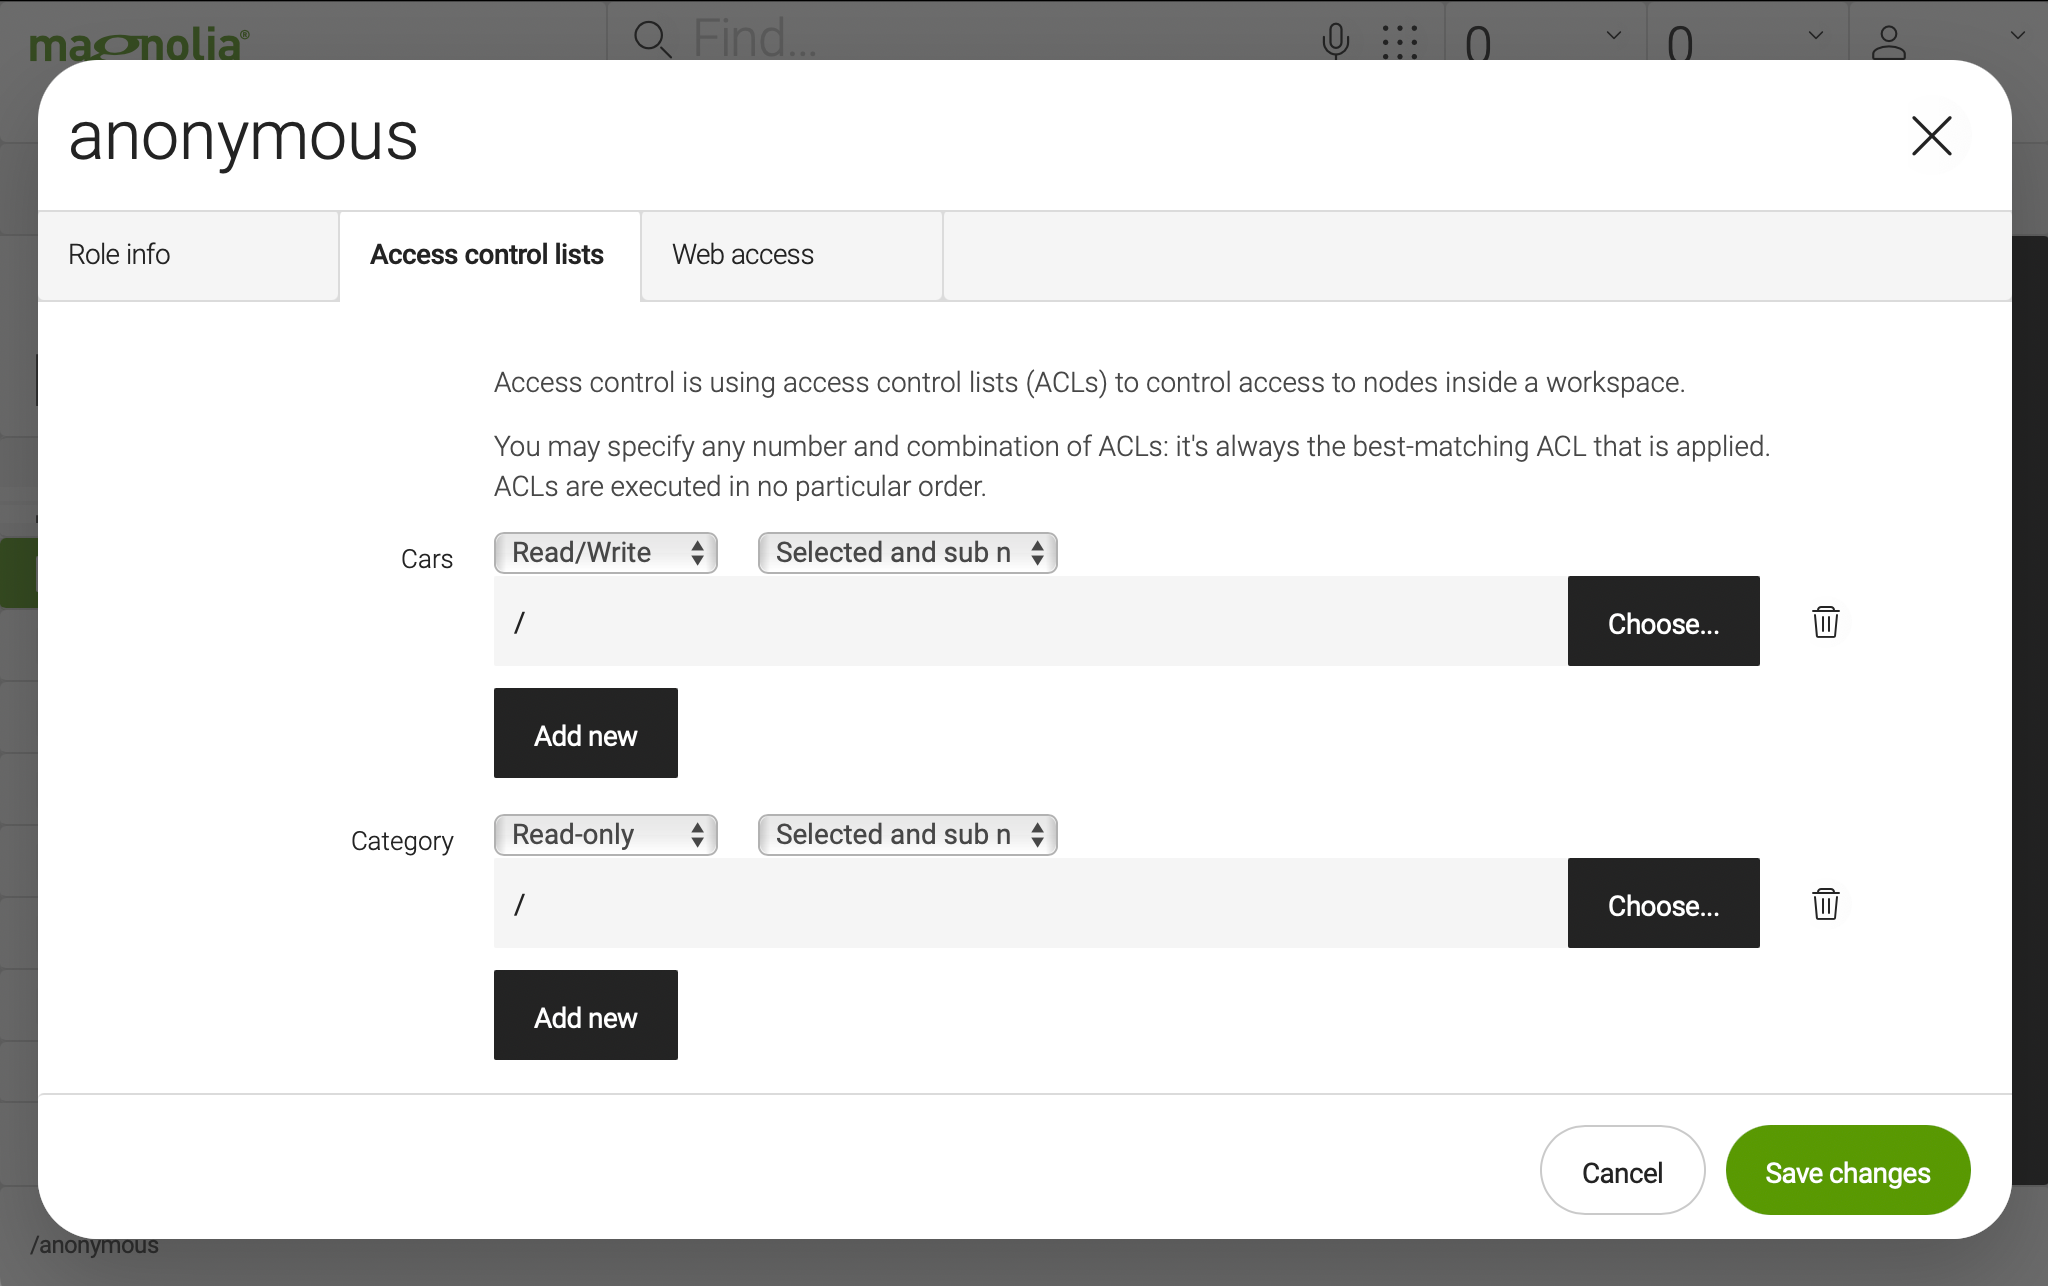
Open the Security app, go to the “Roles” tab, and edit the “anonymous” role. Then the tab “Access control lists” and add Read/Write access for the “Cars” workspace.
You can check the response of the Delivery API with:
  curl -v "http://localhost:8080/magnoliaAuthor/.rest/delivery/cars"
curl -v "http://localhost:8080/magnoliaAuthor/.rest/delivery/cars/Mercedes"
We now have:
Content in the cars workspace
A public endpoint to fetch data
Anonymous access to the content in the cars workspace
To see the page using the web component in Magnolia, open the Pages app and add a new page using the template <Main page>.
When you open the page, you should see this:
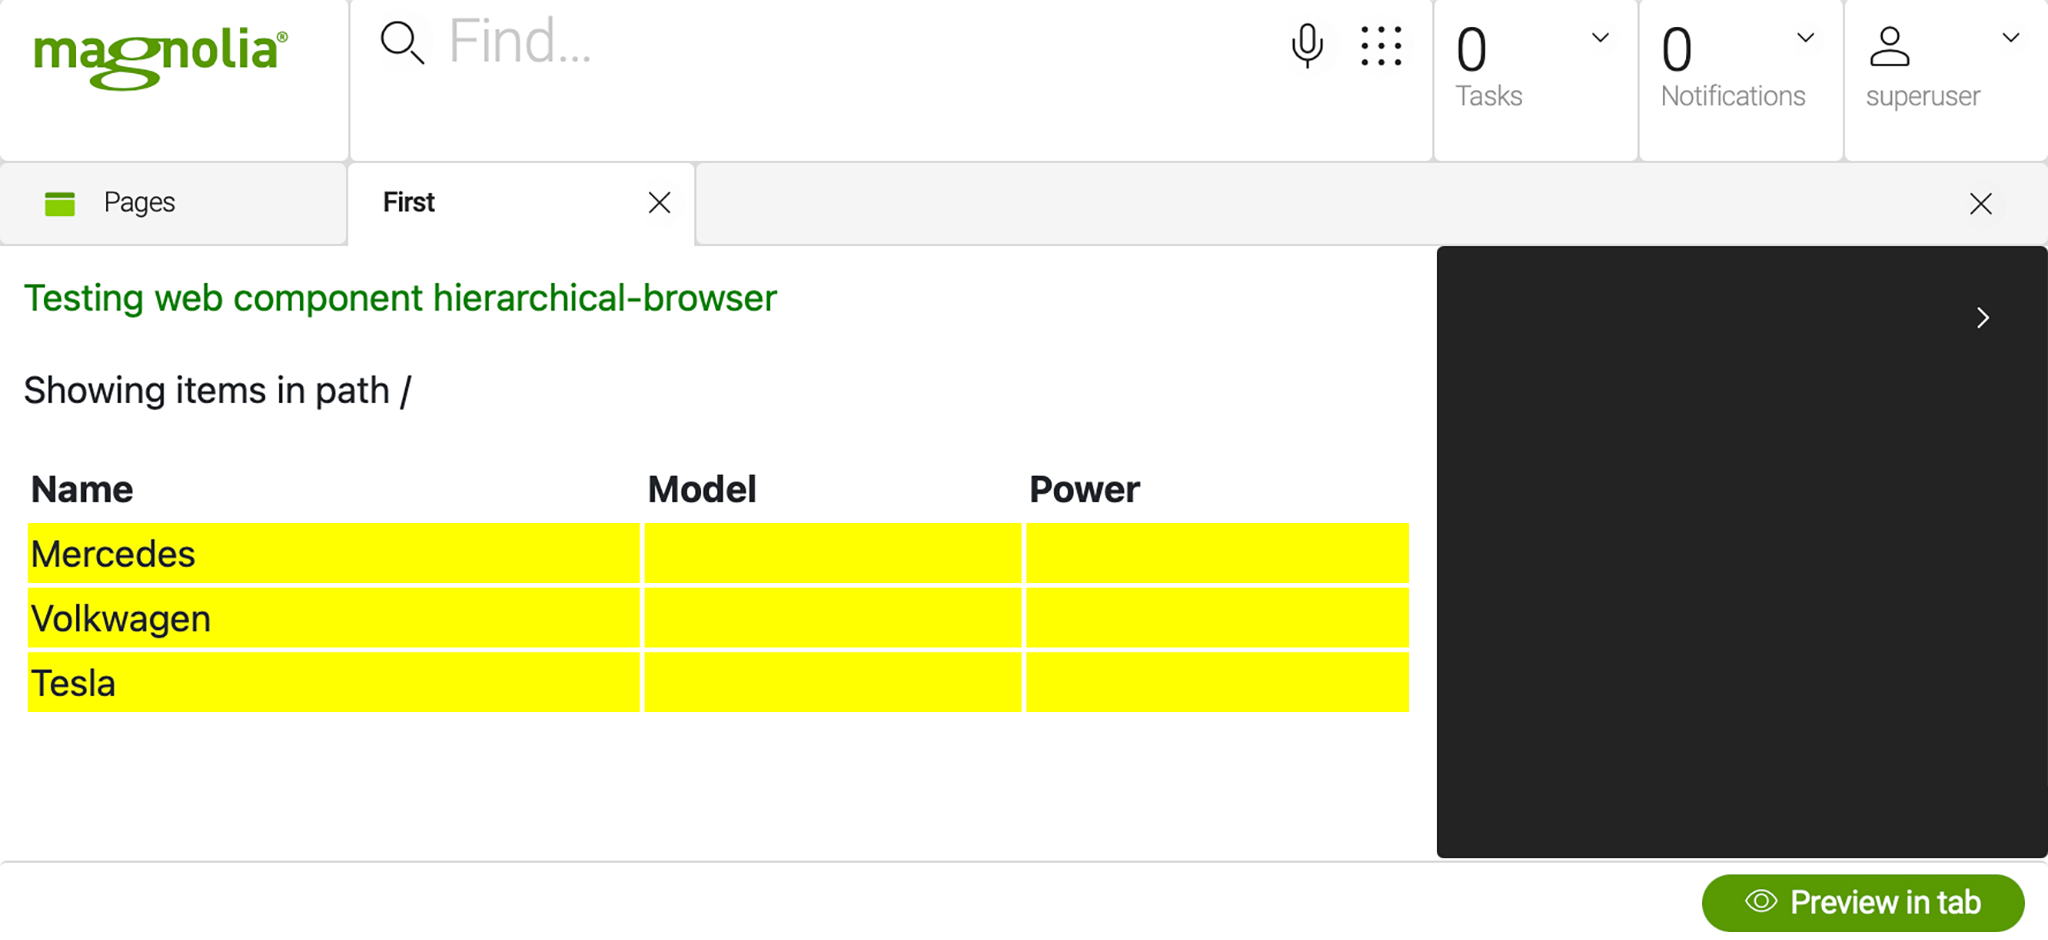
You can click on a yellow row to open a folder and see the hierarchical content inside of it.
Now let’s take a look at the code.
JavaScript REST Client
The functions at the beginning of hierarchical-browser.js handle the HTTP REST calls to fetch the data from the endpoint:
  const getClient = (baseUrl, endpointName) => {
  return {
    baseUrl: baseUrl,
    endpointName: endpointName,
    getItems: function getItems(path) {
      return clientFunctions.makeCall(this.baseUrl + '/.rest/delivery/' + endpointName + path + '@nodes').then(function (data) {
        return JSON.parse(data);
      }).then((json) => {
        return json.map(jsonToItem);
      });
    }
  };
};

const jsonToItem = (data) => {
  var map = new Map(Object.entries(data)).set('isFolder', data['@nodeType'] === 'mgnl:folder');
  map['delete']('@nodes');
  map['delete']('@nodeType');
  return map;
};

const makeCall = (url) => {
  return new Promise((resolve, reject) => {
    var request = new XMLHttpRequest();
    request.open('GET', url);
    request.onload = () => {
      if (request.status === 200) {
        resolve(request.response);
      } else {
        reject(Error('Error making call to ' + url + '; error code:' + request.statusText));
      }
    };

    request.onerror = () => {
      reject(Error('There was a network error making call to ' + url));
    };

    request.send();
  });
};

const clientFunctions = {
  makeCall: makeCall,
  getClient: getClient
};
<getClient> gets a client to make calls to the server. Then, the asynchronous function <getItems> processes the resulting map to get items from a specific path. The JSON response is then converted to a list of maps.
In the subsequent JavaScript code, we initialize the client in the constructor, and <getItems> is called by <loadItems> each time a user requests to see the elements in a specific path.
Hierarchical Browser Web Component
Let’s take a look at the component’s usage in templates/pages/main.ftl:
<hierarchical-browser baseUrl="${ctx.contextPath}" endpoint="cars" columns="name,model,power"></hierarchical-browser> The <baseUrl> is the initial URL used by the REST client to make calls. In our example, the <baseUrl> is http://localhost:8080/magnoliaAuthor.
The <endpoint >parameter is the endpoint’s name as specified in the restEndpoints/delivery folder.
The <columns> parameter is a comma-separated list, specifying the content type fields to fetch. You can specify any fields defined in contentTypes/cars.yaml.
The web component itself is just a table displaying the selected columns. Clickable items, i.e. folders, are yellow. The table is easy to use: you can navigate through the tree by clicking on a folder. When you are in a subfolder, you can click on the parent folder.
Managing the State of the Component
Web Components have the capability of observing changes in attributes using the function <attributeChangedCallback> . If any of the observed attributes change, the component triggers an action.
Our web component listens to changes in the <state> property and calls the <render> function if that property changes:
  get state() {
    return this.getAttribute('state');
}

set state(value) {
    this.setAttribute('state', value);
}

static get observedAttributes() { return ['state']; }

attributeChangedCallback(name, oldValue, newValue) {
  this.render();
}
We don’t need to override the <connectedCallback> function. The constructor sets the initial state of the component, and the state evolves with the REST calls triggered by the user’s interaction. Every time the user clicks on a folder, the web component makes a new call to get the content from the server, and we add an event using <addFolderClickEvent> . The state is <loading> while we get data from the server, <ready> once the data has arrived, or <error>.
Templating
Creating the web component’s HTML code was the most time-consuming task. Because of Web Component’s templating system, I had to add too much presentation code, not helping to separate logic from presentation.
As I commented in the previous post, HTML templates are good for static content but not ideal for adding dynamic content because they are not versatile enough.
I strongly recommend you use a web component framework or at least a hybrid templating solution. For example, use HTML templates for static content and a template library such as Mustache or Handlebars for dynamic content.
Web Component Exercise
Now that you’ve taken a look at my code and possibly seen the web component in action, you might want to do some coding yourself. In that case, I would like to offer you an exercise to increase your knowledge of Web Components and Magnolia.
If you implemented the light module and added cars in the Content app, you might remember that you could add an optional image from the Magnolia DAM in the car properties.
The image is defined in the content type’s configuration file, cars.yaml:
  model:
  properties:
    - name: image
      type: asset
However, the image is not yet part of the web component. So, this is your exercise: modify the code to display the image when a user clicks on a car’s row, i.e. non-folder content.
Feel free to fork the GitHub repository and send pull requests with this exercise, other exercises, fixes, or improvements. I will be very happy to merge them.
Investing in the Future of Web Development
The Web Components standard offers reusable components for web development. Creating web components is an investment in the future because components can be used everywhere, with any JavaScript framework and in any HTML environment.
The cars use case is a good and simple example to learn how to create a web component. It also shows the problems with HTML templates. While I didn’t explain all the details, I did explain the basics to help you understand what the web component does. If you want to dig deeper, you might want to look at the code for the logic managing the parent folder, the HTTP client code, and dom manipulation.
If you are interested in more advanced Web Components features, such as Web Components communication, testing, or shadow CSS, I recommend you check out my previous blog post “Web Components Part 1: Exploring Reusable Web Components” and its source code on GitHub.
I hope you enjoyed creating this web component and working with Magnolia!