- Jul 5, 2022
- --
Deploying an Antora Site in AWS Using CI/CD and Jenkins
-
 Khiem Do HoangSenior Site Reliability Engineer, Magnolia


Experience Magnolia in action
Experience Magnolia's key features firsthand in an interactive product tour.
Take a tour nowThis is the second article of two on how to efficiently build and deploy documentation sites using Antora. In the first article "Using AsciiDoc and Antora to Create Online Technical Documentation" we showed you how Antora can facilitate the process of creating quality, single-source content using the AsciiDoc markup language.
In this article, we’ll show you how to deploy and publish the site efficiently and securely on AWS. We’ll also describe the infrastructure and deployment pipeline using Terraform and Jenkins, two popular platforms for infrastructure orchestration and continuous delivery pipeline declaration.
In the end, we will have the source code for documentation, infrastructure, and continuous deployment pipeline, aka “Everything-as-Code”, in our Git repositories. Every change to the content or infrastructure will then be automatically applied to the site’s environments.
AWS Infrastructure
The diagram below illustrates AWS resources and their connections for hosting and serving Antora resource content from AWS to end users. We’ll go through each resource in the following sections.
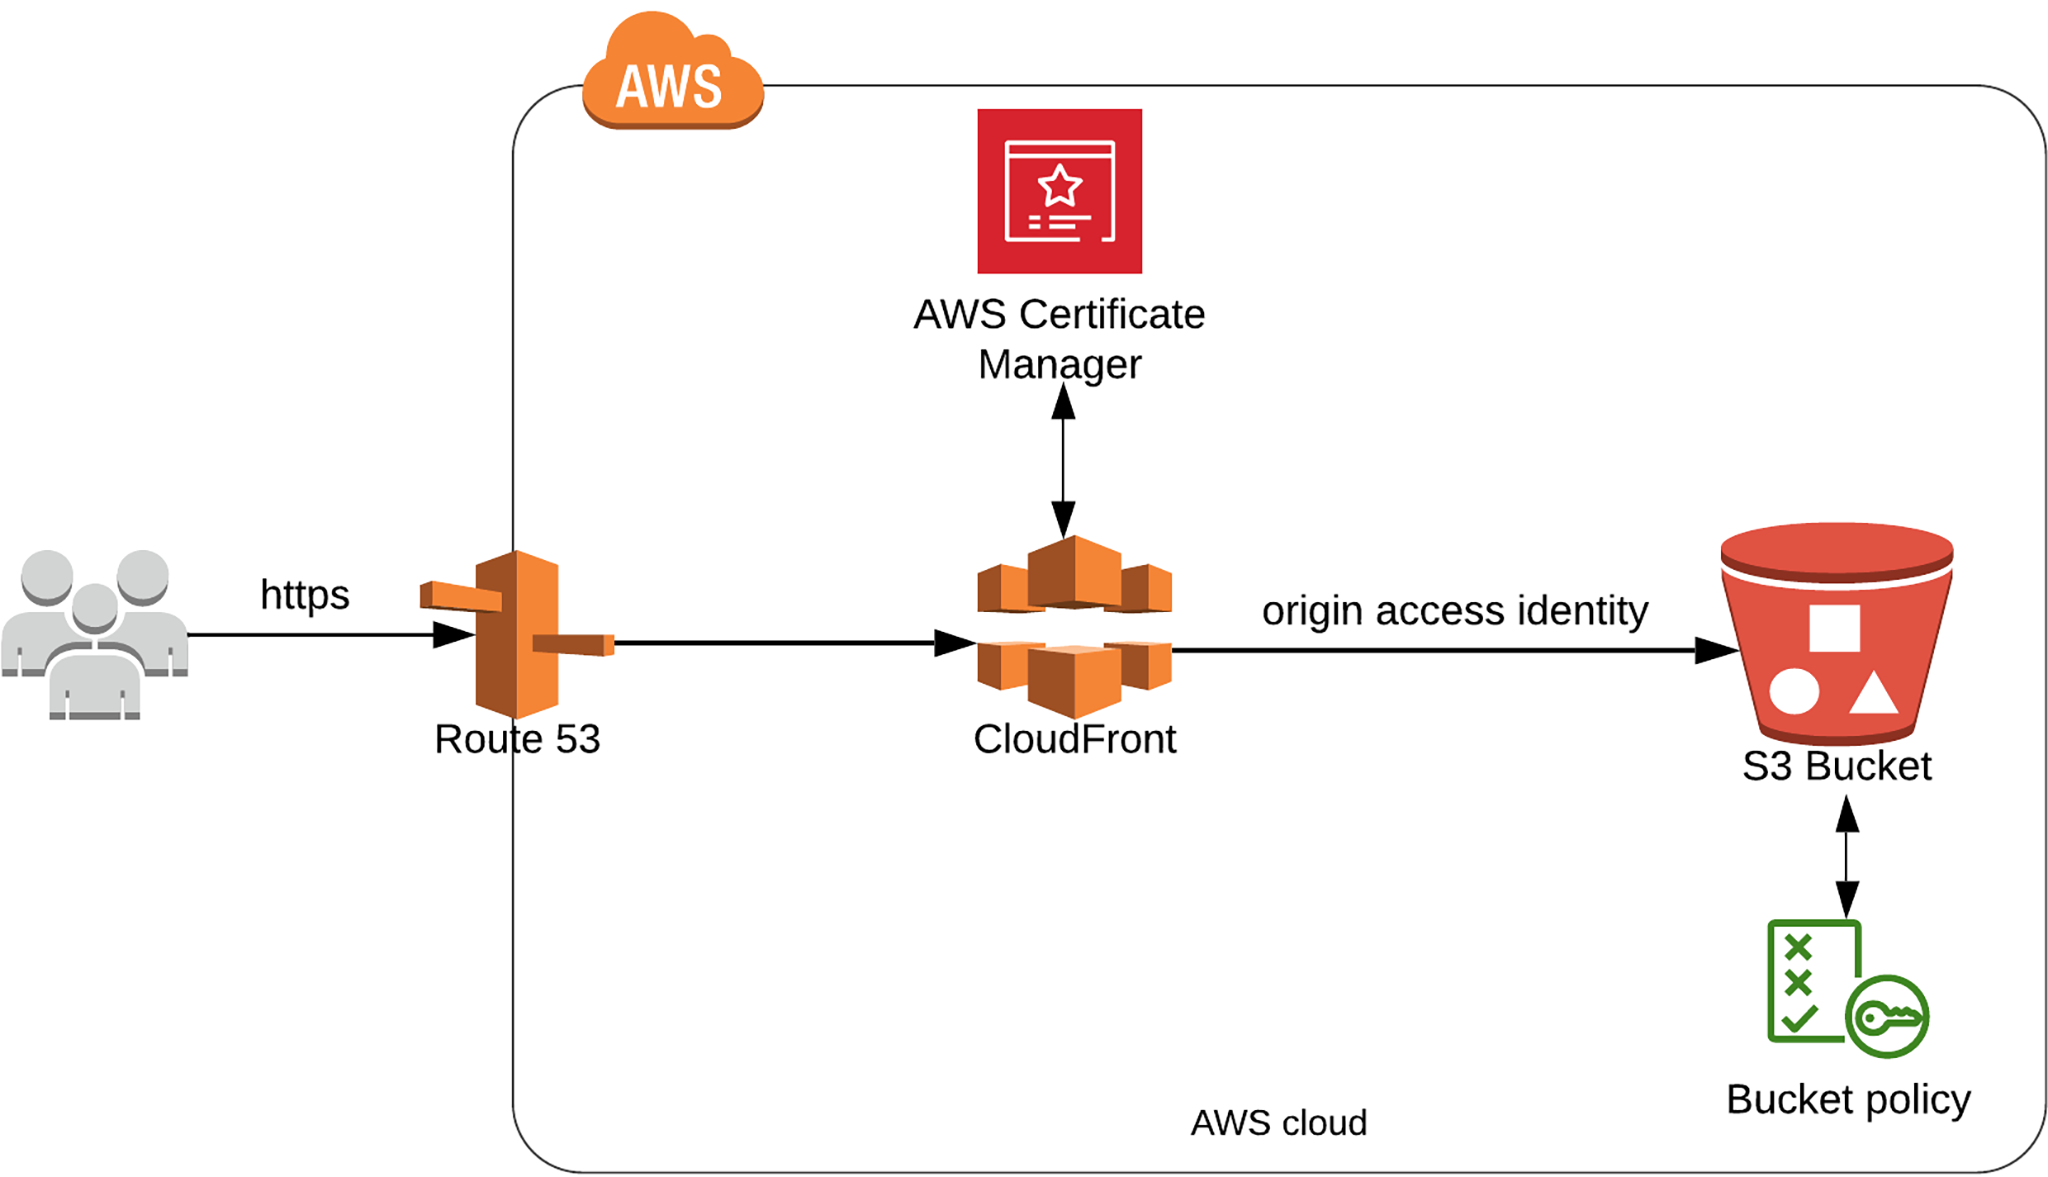
Hosting Content and Assets in S3
First of all, we need to store our documentation content and static assets, such as images, JavaScript, CSS, and videos, in a secure and scalable storage. Amazon S3 is designed to easily store and retrieve any number of files in a durable, highly available, and scalable way at low cost.
Below is the Terraform configuration for the S3 bucket:
 resource "aws_s3_bucket" "bucket" {
  bucket = var.site_domain
  acl    = "private"
}

resource "aws_s3_bucket_public_access_block" "public_access_block" {
  bucket = aws_s3_bucket.bucket.id
  block_public_acls   = true
  block_public_policy = true
  restrict_public_buckets = true
  ignore_public_acls = true
}

resource "aws_s3_bucket_policy" "bucket_policy" {
  bucket = aws_s3_bucket.bucket.id
  policy = <<POLICY
{
   "Version": "2012-10-17",
   "Statement": [
       {
           "Sid": "OAIReadGetObject",
           "Effect": "Allow",
           "Principal": {
             "AWS": "${aws_cloudfront_origin_access_identity.identity.iam_arn}"
           },
           "Action": [
             "s3:GetObject",
             "s3:ListBucket"
           ],
           "Resource": [
             "arn:aws:s3:::${var.site_domain}/*",
             "arn:aws:s3:::${var.site_domain}"
           ]
       }
   ]
}
POLICY
  depends_on = [aws_s3_bucket_public_access_block.public_access_block]
}
Typically, we name the bucket the same as the variable site_domain, for example documentation.yourdomain.com. This ensures the uniqueness of the bucket globally.
All direct public access to the bucket is disabled in the aws_s3_bucket_public_access_block resource, as we will only allow access to the bucket’s content through CloudFront using Origin Access Identity (OAI) by specifying the bucket policy document aws_cloudfront_origin_access_identity.identity.iam_arn as Principal.
Tips for Writing Antora Macros
We use AsciiDoc and Antora to build Magnolia’s documentation. To add dynamic content such as version numbers to the static pages, we created Antora macros. Read our blog to learn more.
Read nowContent Delivery Through CloudFront
S3 supports hosting static websites directly in the bucket, but it is best practice to use a CloudFront distribution in front of your S3 bucket to efficiently deliver your content to users.
CloudFront is a Content Delivery Network (CDN) that serves content through a worldwide network of data centers, called edge locations. By caching content and routing requests to nearby edge locations, CloudFront reduces the load on the S3 bucket, ensuring faster response times. Additionally, serving content through CloudFront is more cost-effective than serving files directly from S3 as there is no fee to transfer data from S3 to CloudFront.
In the CloudFront distribution, we’ll specify the S3 bucket as the origin with its specific origin id and region-specific domain name.
In the previous section we configured the S3 bucket to block all public access. We will grant the read and get permissions to the Origin Access Identity (OAI) which we create for the CloudFront distribution in its origin config. You can read more about OAI configuration in AWS’s documentation "Restricting access by using an origin access identity (OAI)".
Now, you can specify the Cache Behavior settings for the distribution and its origin, including its caching functionality based on path patterns, HTTP methods, HTTP headers, and Minimum/Maximum TTL. You can find more information in “Cache behavior settings”.
Below is the Terraform configuration for the OAI and CloudFront distribution resources:
 resource "aws_cloudfront_origin_access_identity" "identity" {
  comment = "Origin access identity for docu web in S3"
}

locals {
  s3_origin_id = "${var.site_domain}-s3-origin"
}

resource "aws_cloudfront_distribution" "s3_distribution" {
  origin {
    domain_name = aws_s3_bucket.bucket.bucket_regional_domain_name
    origin_id   = local.s3_origin_id

    s3_origin_config {
      origin_access_identity =
aws_cloudfront_origin_access_identity.identity.cloudfront_access_identity_path
    }
  }

  enabled             = true
  is_ipv6_enabled     = true
  comment             = "Some comment"
  default_root_object = "index.html"
  aliases             = [var.site_domain]
  price_class         = "PriceClass_100"

  default_cache_behavior {
    allowed_methods  = ["DELETE", "GET", "HEAD", "OPTIONS", "PATCH", "POST", "PUT"]
    cached_methods   = ["GET", "HEAD"]
    target_origin_id = local.s3_origin_id

    forwarded_values {
      query_string = false
      cookies {
        forward = "none"
      }
    }

    viewer_protocol_policy = "allow-all"
    min_ttl                = 0
    default_ttl            = 3600
    max_ttl                = 86400
  }

  restrictions {
    geo_restriction {
      restriction_type = "none"
    }
  }

  viewer_certificate {
    acm_certificate_arn = data.aws_acm_certificate.cert.arn
    ssl_support_method = "sni-only"
    minimum_protocol_version = "TLSv1.2_2018"
  }
}
Note that we configured a TLS certificate in the aws_cloudfront_distribution block which we will describe in the next section.
AWS Certificate Manager (ACM)
The CloudFront distribution does not only serve the content with caching and secure access to the S3 bucket via OAI, it also associates with AWS ACM certificates to achieve HTTPS using your custom domain. In the configuration below we assume the certificate is already issued in ACM and stored in the domain variable ssl_cert_domain.
The certificate ARN is then configured in the viewer_certiticate block of the aws_cloudfront_distribution.
 data "aws_acm_certificate" "cert" {
  domain = var.ssl_cert_domain
  statuses = ["ISSUED"]
  provider = aws.us-east-1
}

resource "aws_cloudfront_distribution" "s3_distribution" {
  ...

  viewer_certificate {
    acm_certificate_arn = data.aws_acm_certificate.cert.arn
    ssl_support_method = "sni-only"
    minimum_protocol_version = "TLSv1.2_2018"
  }
}
Route53 as DNS Service
As the last piece of the stack, we configure an Amazon Route 53 record for DNS resolution. This step associates our site’s domain with the CloudFront distribution, as long as we already have already configured a hosted zone (route53_hosted_zone) in Route 53.
 data "aws_route53_zone" "r53_zone" {
  name = var.route53_hosted_zone
}

resource "aws_route53_record" "r53_records" {
  name = var.site_domain
  type = "A"

  alias {
    evaluate_target_health = false
    name = aws_cloudfront_distribution.s3_distribution.domain_name
    zone_id = aws_cloudfront_distribution.s3_distribution.hosted_zone_id
  }
  zone_id = data.aws_route53_zone.r53_zone.zone_id
}
Integrating with CI/CD Pipeline
If you followed the steps from the first article and thus far, you described your content and infrastructure in code. We can now start using Terraform to create the infrastructure, then build the site content with Antora, and push all content and assets to the S3 bucket.
It’s generally a good idea to create an automated deployment pipeline with all the above steps to ensure a seamless deployment. Any changes from the site content repository or the infrastructure repository should be verified, built, and reflected in the deployed site.
Below is a sample of the Jenkins pipeline to deploy the Antora site to two environments: staging and production.

If you wish, you can also make the production deployment optional via a parameter.
These are the pipeline steps:
Verify Changes
In this step we run some early verification on the source code. At the moment there’s no “linting” for Antora, but we can use terraform plan to verify and generate the plan of changes in the infrastructure.
Build UI Bundle
This step relates to the “Building The Antora Demo UI Project” section from the previous article. It is typically done using a Gulp build script, for example:
 cd ui/
npm install
npm install gulp-cli
./node_modules/.bin/gulp bundle
Build Antora Site
This step relates to the “Running The Antora Demo Playbook” section from the previous article to generate the HTML pages from the playbook:
 # generated files in build/site/ directory
antora generate playbook.yml
Deploy Infra in Staging/Production
To create the infrastructure resources in AWS, we run terraform apply for each environment, for example:
 # apply in staging
terraform apply -var-file=docu.staging.tfvars -auto-approve
# apply in production
terraform apply -var-file=docu.prod.tfvars -auto-approve
Deploy Antora Site to S3 in Staging/Production
In the last step, all site content and assets are pushed to the S3 bucket using the sync command from the AWS CLI tool. Note that the --delete option is used to ensure that there are no obsolete files in the S3 bucket.
 # deploy in staging
aws s3 sync build/site/ s3://${env.STAGING_S3_BUCKET}/ --delete
# deploy in production
aws s3 sync build/site/ s3://${env.PRODUCTION_S3_BUCKET}/ --delete
While we used Jenkins in this example, the pipeline should be fairly similar in other CI/CD platforms.
Modern Documentation Projects
Each change to the Antora documentation project is deployed automatically thanks to development pipelines that take care of generation and deployment. This process greatly speeds up the iterative approach to modern documentation that would otherwise lag behind development.
Serving the Antora site from the CDN also helps to mitigate any negative impact of the client’s geolocation.
Altogether, this approach keeps infrastructure costs low while making modern documentation projects more performant and robust; and that is something we should all strive to focus on more.