- May 25, 2021
- --
The End of the Web: Mastering 404 Errors with Magnolia
-
 Tobias KerschbaumPre Sales & Consulting Manager, Magnolia


Experience Magnolia in action
Experience Magnolia's key features firsthand in an interactive product tour.
Take a tour nowDealing with 404 errors is an inevitable part of managing a website. For more established sites, it is almost impossible to keep all cross-links always up to date. There are several reasons that can lead to broken links, including:
1. A misspelled URL
If you follow the best practice of defining references as UUID to other pages via a dialog in Magnolia, you don’t have to worry about misspelled URLs. However, if you save references by path instead of UUID or type links in a text field, a typo would lead to a page not found.
2. The page has been moved or deleted, and there is no redirect
Moving a page should not cause any problems, provided you follow best practices. However, if you delete a page without changing its references or creating a redirect, a 404 error occurs.
3. Links from external websites are out of date
Links to non-existent pages from external sources are most challenging. In many cases, you don’t influence when someone gets redirected to your website. Therefore, it is often difficult to determine where these requests come from and why they are happening.
Our list of possible causes shows that it is nearly impossible to prevent all 404 errors. Therefore, it is essential to be able to record and handle these errors. In this article, I will reveal how to respond to 404 errors in single-site and multi-site scenarios. I will also show you how to track these errors and handle them directly in Magnolia.
Creating a custom error page
You can create a custom error page with the same look and feel as the rest of your site. As described in our documentation, the easiest way is to do this is to map a static HTML page in the web.xml of the project. Alternatively, you can style the default 404 page.
We handle 404 errors without any additional configuration, but 404 is not the only HTTP error code. You can set up pages for any of the other error codes in the same way.
The fastest way to overwrite the default error page is to copy the whole docroot directory from the Maven overlays into your web app. You can then easily change the 404.html file as you like. If you want to map other errors, you should also copy the web.xml from the overlays.
In IntelliJ, we find the overlays directly under the webapp.

You can find the section for error mapping at the end of the file.
<webapp>/src/main/webapp/WEB-INF/web.xml
  <!-- more content above -->
  <error-page>
    <error-code>404</error-code>
    <location>/error/404.html</location>
  </error-page>
To map a new error, just add a new entry.
<webapp>/src/main/webapp/WEB-INF/web.xml
<!-- more content above -->
  <error-page>
    <error-code>403</error-code>
    <location>/error/403.html</location>
  </error-page>
You can then create the error page error-403 in the following path:
<webapp>/src/main/webapp/docroot/403.html
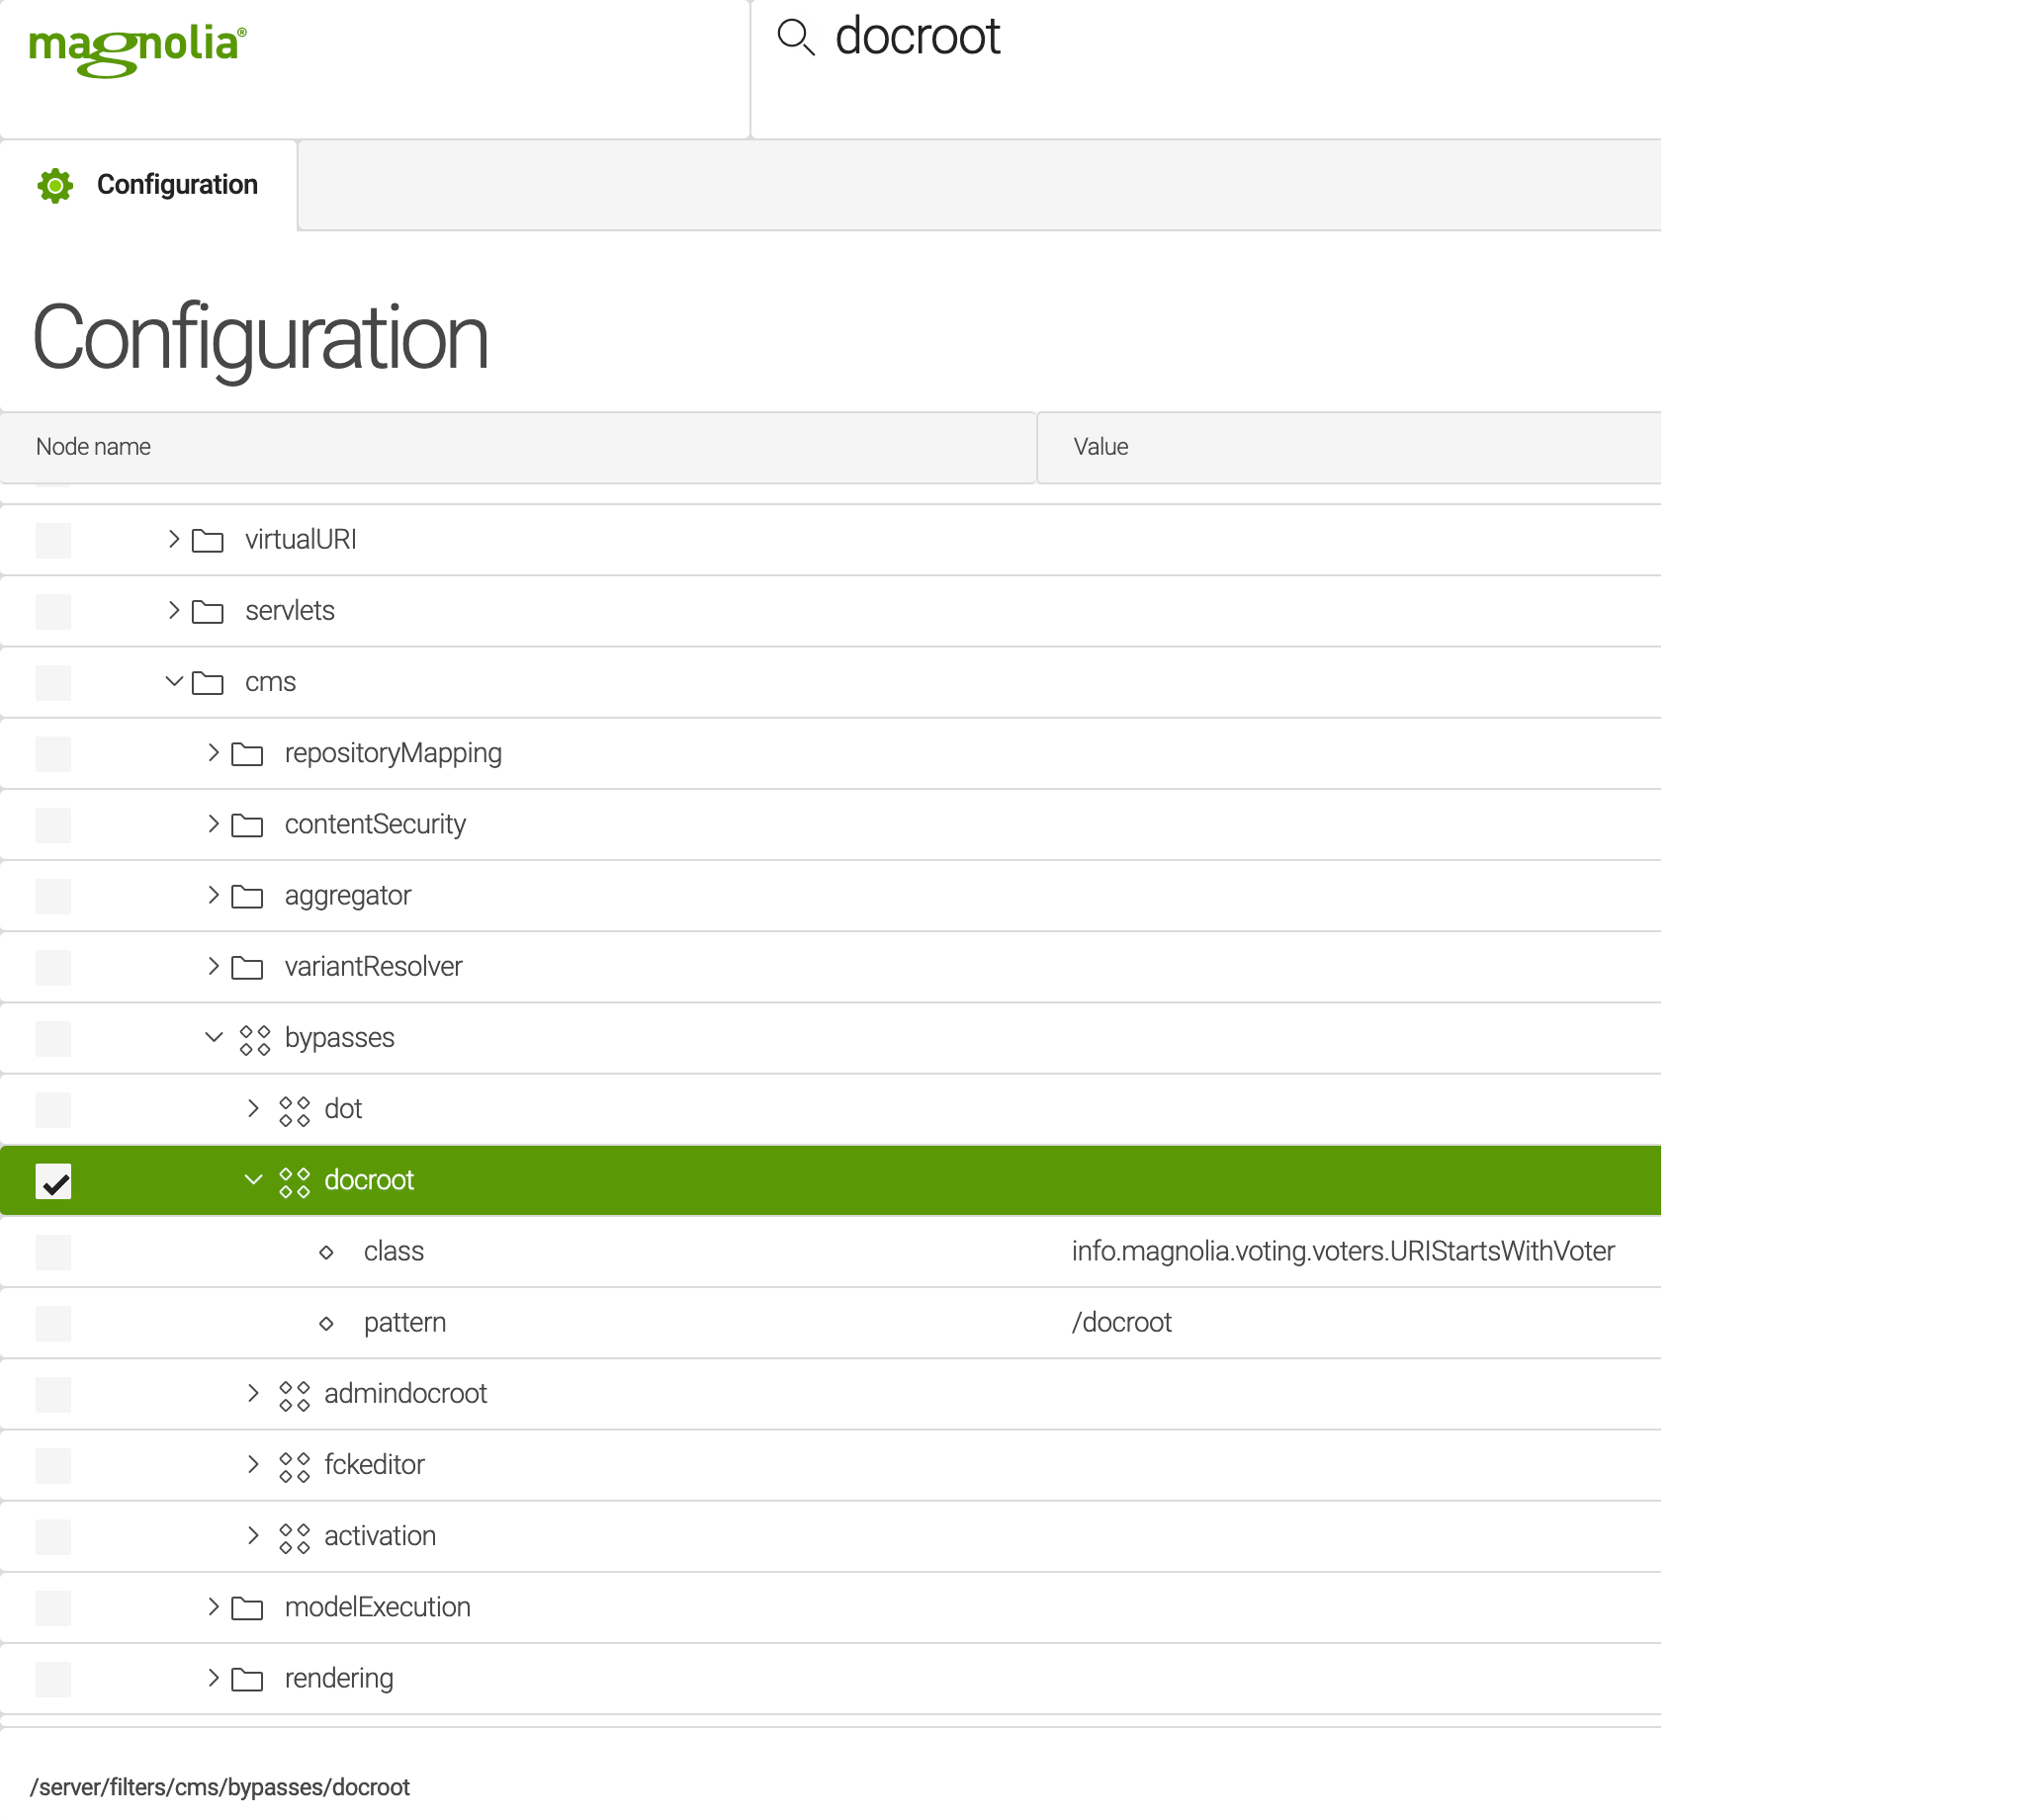
Magnolia's default path "/docroot" is known in server, filters, cms, and bypasses nodes. When using another path, be sure to add a bypass for it.
As you saw, integrating a custom 404 error page in Magnolia and mapping any other HTTP errors to dedicated error pages is straightforward. However, if you want your authors to manage site-specific error pages or make use of themes, you need a more flexible solution. I’ll explain how to solve this in the next section.
Creating a custom Magnolia error page
The ability to maintain a separate error page for each error code is excellent. However, there are some advantages to managing the error pages directly in the CMS:
Allowing authors to change the content of error pages themselves regardless of new release deployments
Using existing styles from themes
Using existing components from the project
Based on our Community Wiki article, I will now show you step by step how to manage error pages directly in Magnolia.
Single-Site
You can make error pages configurable in Magnolia in three simple steps.
1. Mapping the error
Change the error mapping in the web.xml. Instead of mapping the error to a static page, map to a new path.
<webapp>/src/main/webapp/WEB-INF/web.xml
  <!-- more content above -->
  <error-page>
    <error-code>404</error-code>
    <location>/my-virtual-uri-mapping/error-404</location>
  </error-page>
2. Creating a virtual URI mapping
Create a Virtual URI mapping directing the new path to a Magnolia page.
<light-module>/virtualUriMappings/error404SingleSite.yaml
class: info.magnolia.virtualuri.mapping.DefaultVirtualUriMapping
fromUri: /my-virtual-uri-mapping/error-404
toUri: forward:/catched404Error
3. Creating the error page in Magnolia
Create the page defined in the Virtual URI mapping in Magnolia. In the example configuration, the error page is on the root level, but you can use a substructure if you want to.
Creating Content Types the low-code way
Creating Content Types in Magnolia is now even easier. The Content Type Models App allows developers and non-developers to create Content Types visually. Read our blog to learn more.
Read nowMulti-Site
To create an error page for each site in a multi-site scenario, just change the virtual URI mapping so that it directs to the right page depending on the host.
<light-module>/virtualUriMappings/error404MultiSite.yaml
class: info.magnolia.virtualuri.mapping.HostBasedVirtualUriMapping
fromUri: /my-virtual-uri-mapping/error-404
toUri: forward:/catched404Error
mappings:
 travel_de:
  host: travel.de
  toUri: forward:/de/travel/catched404ErrorTravel
 travel_en:
  host: travel.en
  toUri: forward:/en/travel/catched404ErrorTravel
 sportstation:
  host: sportstation
  toUri: forward:/sportstation/catched404ErrorSportstation
Tracking 404 errors
It can be pretty tedious to get an overview of when and how often 404 errors occur. Instead of analyzing the log files, it would be much more convenient to analyze and process the errors directly in Magnolia.
For this purpose, we developed the Link Mapper module. This module stores 404 errors in an external database and allows you to view the data in a Magnolia app. The app shows you which URL was called, which referrers and parameters were attached to the request, and how often the error occurred. You can then choose to redirect the URL to another page or blacklist it. Let’s look at how we can set this up.
Setting up the database and the Quarkus backend server
Setting up Postgres
Set up a Postgres database to store 404 errors, for example, using Docker:
### Pull docker image ###
docker pull postgres
### Run docker image ###
docker run --name postgres -e POSTGRES_USER=root -e POSTGRES_PASSWORD=root -e POSTGRES_DB=test -d -p 5432:5432 postgres
Setting up the back-end server
The back-end server collecting the 404 errors is a Quarkus application server. It is very lightweight and fast.
To run the backend, check out the Quarkus project from Git:
### Checkout quarkus server project ###
git clone ssh://git@git.magnolia-cms.com/services/linkmapper-quarkus-postgresql.git
Open a console and navigate to the project folder. Build the project, then create the Docker image and launch it:
### Building the project ###
mvn package

### Build docker image ###
docker build -f src/main/docker/Dockerfile.jvm -t quarkus/linkmapper-backend-plsql .

### Run docker image ###
docker run -d --name linkmapper-backend-plsql -p 8090:8090 -p 5005:5005 -e JAVA_ENABLE_DEBUG="true" quarkus/linkmapper-backend-plsql
If you want to adjust the log level, connect to another Postgres database, or influence the schema creation, there are two ways to do this:
You can either change the application properties directly under
“<project-folder>/src/main/resources/application.properties” orSet them via environment variables in docker run.
Setting up the Magnolia module
Now that your database and back-end server are up and running, the last step is to install the Link Mapper module and configure the connection in Magnolia.
Installing the Link Mapper module
As with any Magnolia module, the easiest way is to install it is via Maven. Therefore, add the following dependency to your pom.xml:
<dependency>
  <groupId>info.magnolia.linkmapper</groupId>
  <artifactId>magnolia-linkmapper</artifactId>
  <version>${linkMapperVersion}</version>
</dependency>
Configuring the REST client
You now need to configure the URL under which your Quarkus backend runs. In my example, it is my localhost, port 8090. To keep the configuration flexible, you can configure it as a YAML decoration in a Light Module.
<light-module>/decorations/linkmapper/restClients/linkMapperService.yaml
baseUrl: 'http://localhost:8090/lima/v1/'
Configuring the access token
The last step of the configuration is choosing a client identifier and setting the access token.
The client identifier ensures that only entries for one instance are retrieved when using the Quarkus backend for multiple Magnolia instances.
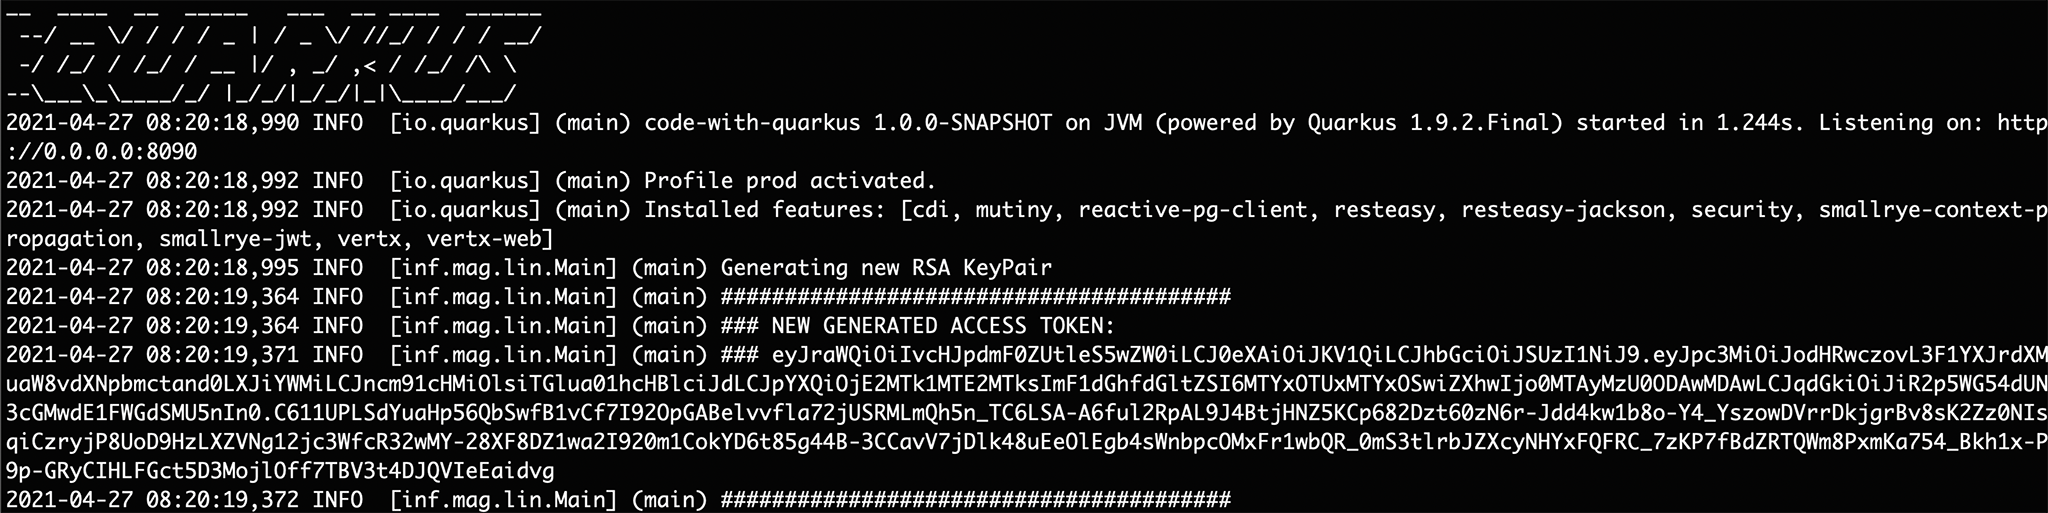
The access token is generated by the Quarkus backend when it is started for the first time. Check the logs of the Docker container to get the token.
Open a terminal and list all running Docker containers:
### List running containers ###
docker ps

Then print the logs of the container running the Quarkus backend:
### Print log of container ###
docker logs <container-id>
Copy the access token from the log:
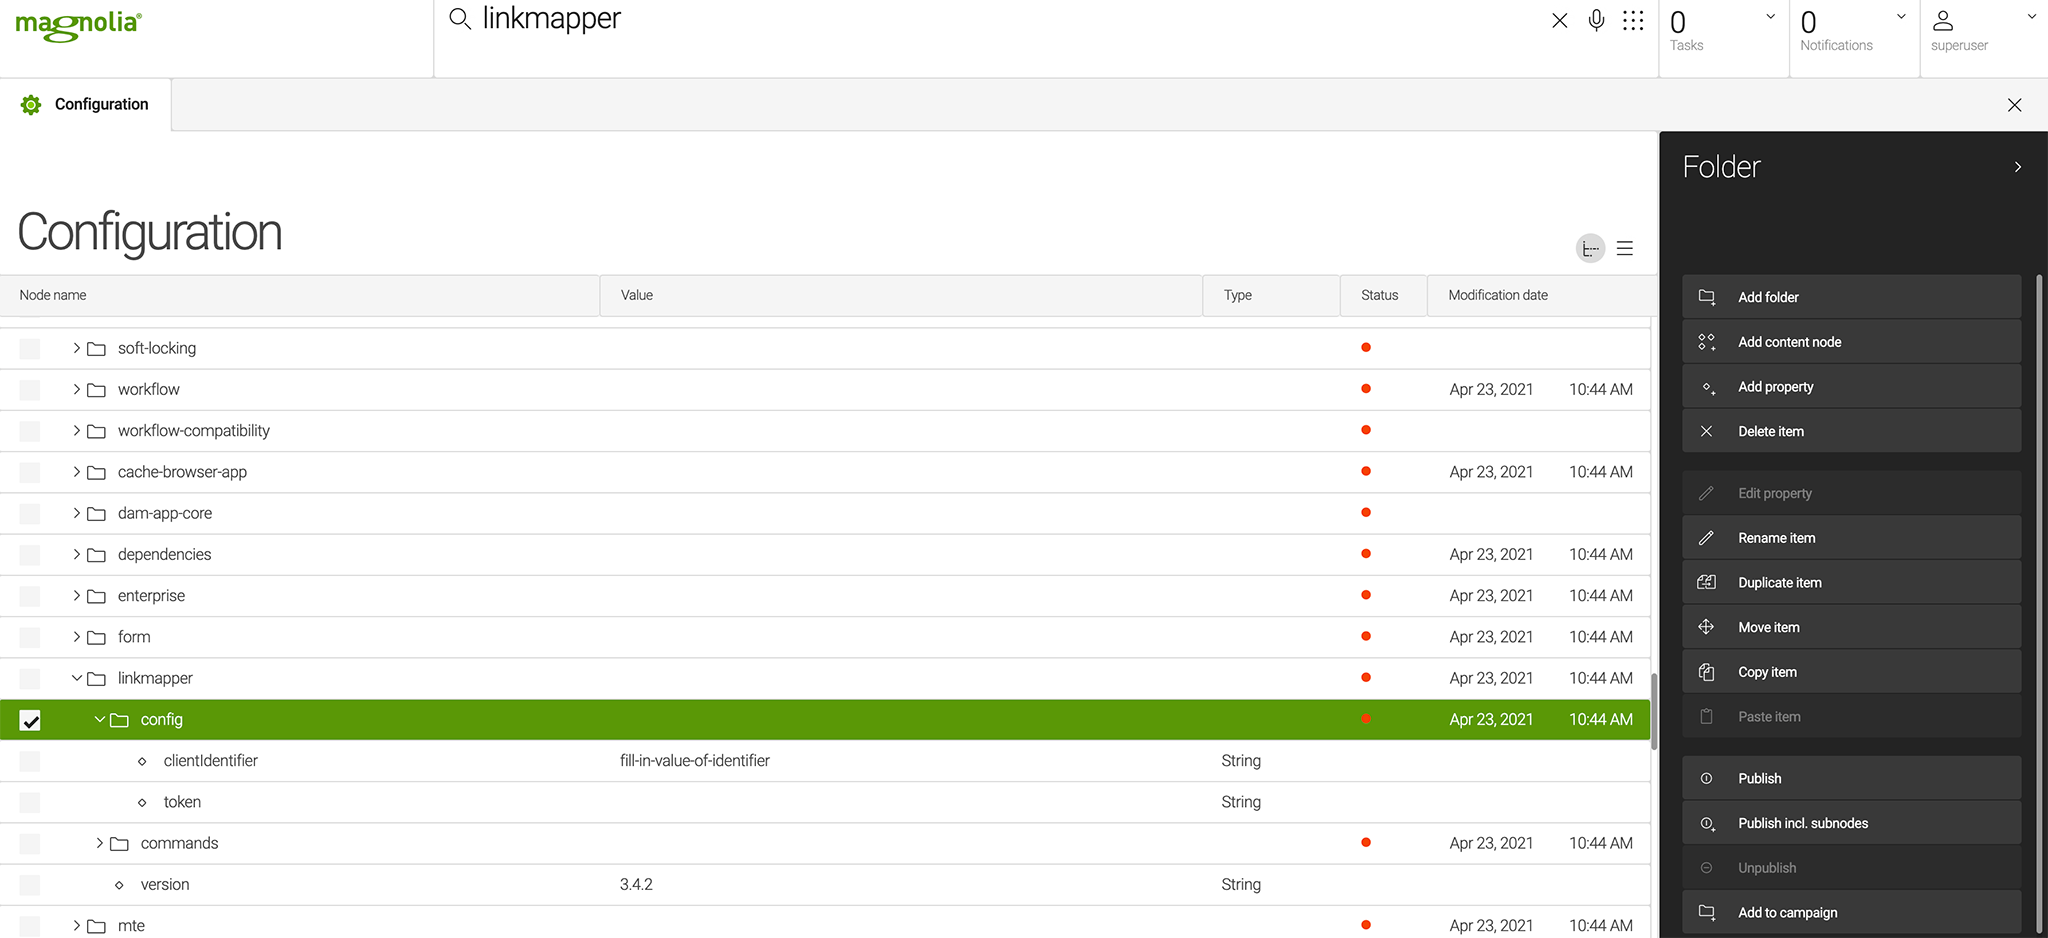
Then, open the configuration app in Magnolia and look for the Link Mapper module. Alternatively, simply enter "linkmapper" in the Find Bar.
Add the client identifier and the access token in the config node:
Testing the module
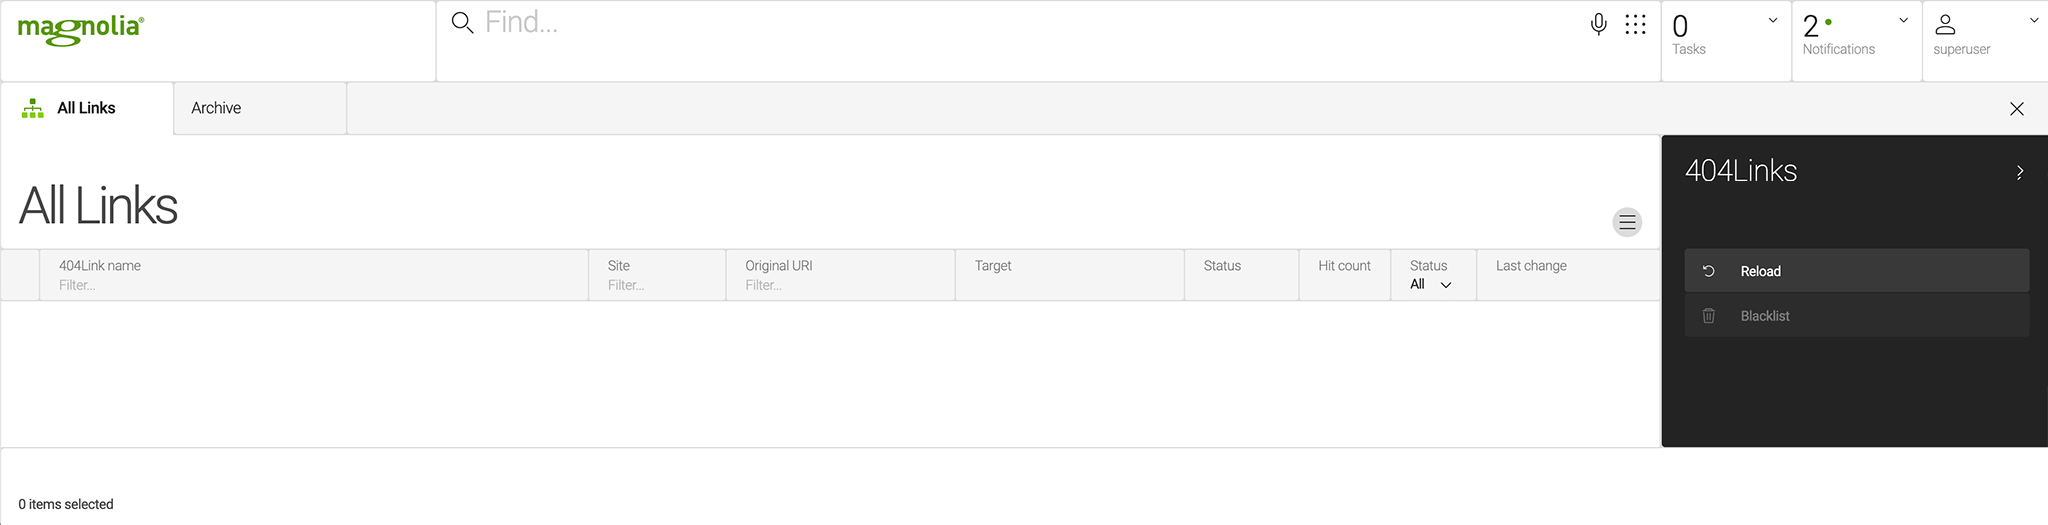
You can now test the Link Mapper. To do this, open the 404links app and press the reload action in the right navigation bar. If you see the message "Links loaded successfully," everything is working fine.
To test the module, open a page that does not exist, for example, "http://localhost:8080/Apagewhichisnotthere". When you press the reload button again, you should see an entry in the app.
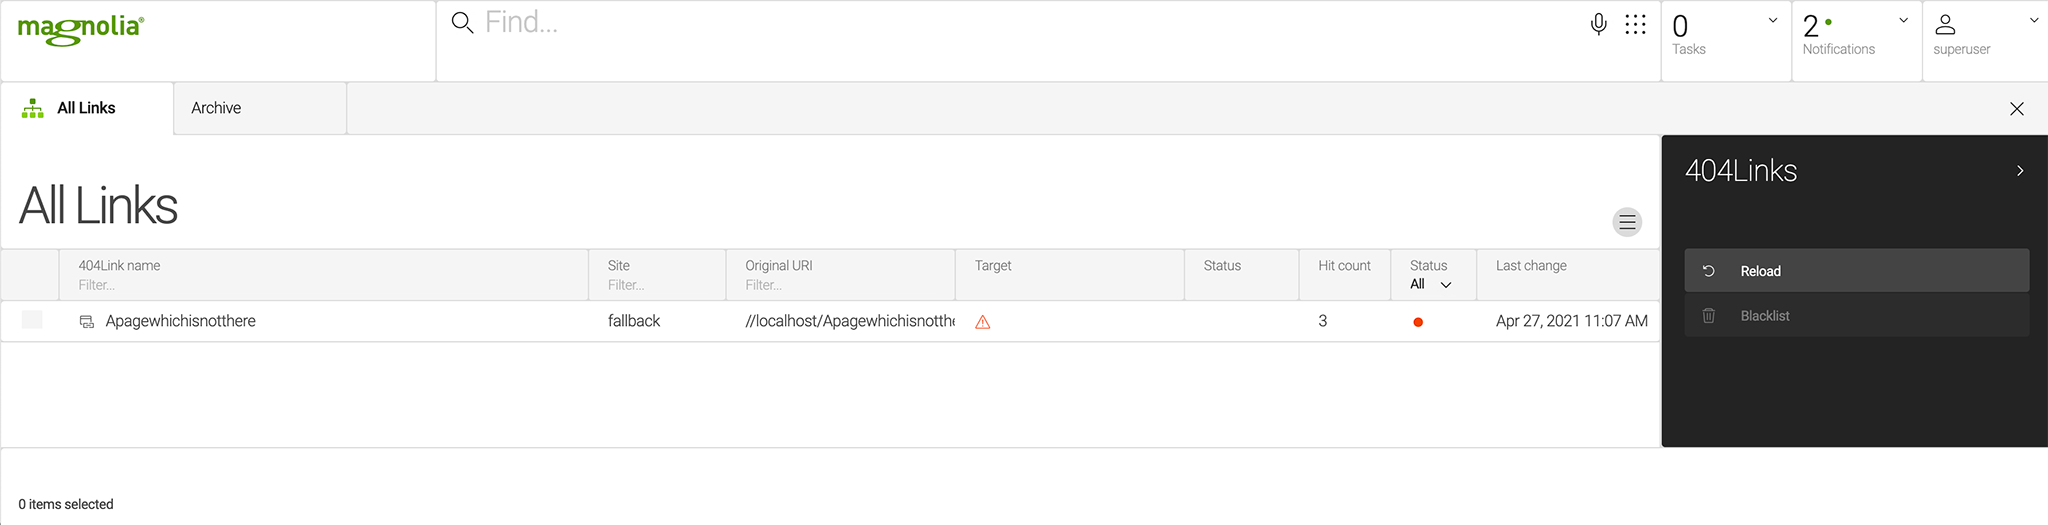
If you call the link several times and press the reload action again, you should see the hit count increasing.
Select the entry to blacklist the link or edit the entry. In the editing dialog, you can configure a redirect and list referrer and query parameters.
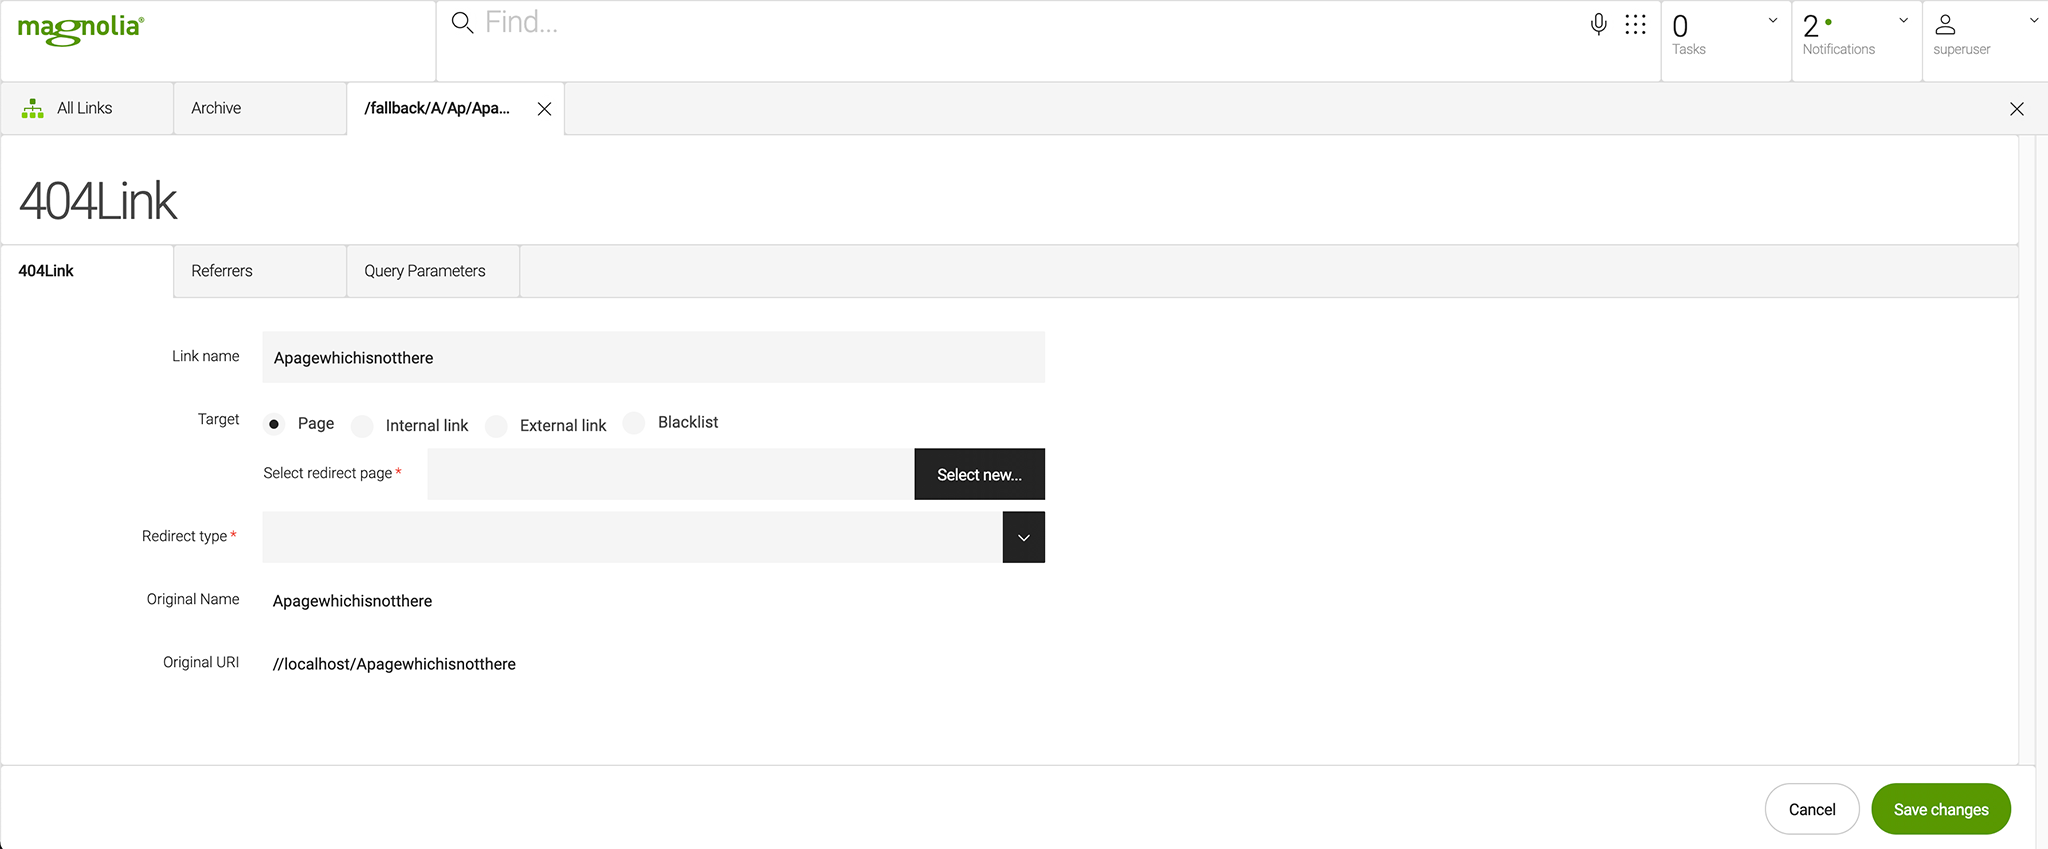
To keep the list manageable, you can archive entries that you have already dealt with.
Handling 404 errors with ease
It’s very easy to configure your project’s error pages with Magnolia and keep a good overview of 404 errors when they occur. Furthermore, you can easily blacklist links or create redirects for non-existent links, providing a better experience to your visitors.